https://github.com/zytc2009/BigTeam_learning
分类: Java
2010-10-19 13:23:17
如果要繼續體驗 View 的樂趣,那麼「WebView」這個 View 無疑是最佳人選。android.webkit.WebView 是使用「WebKit」技術的 View,主要的用途是「顯示網頁」。使用 WebView,我們可以在 Android 應用程式裡顯示自已的 HTML 文件,或是線上的網頁。
接下來請依照以下步驟,建立我們的第二個 Android 應用程式「Hello Web」。
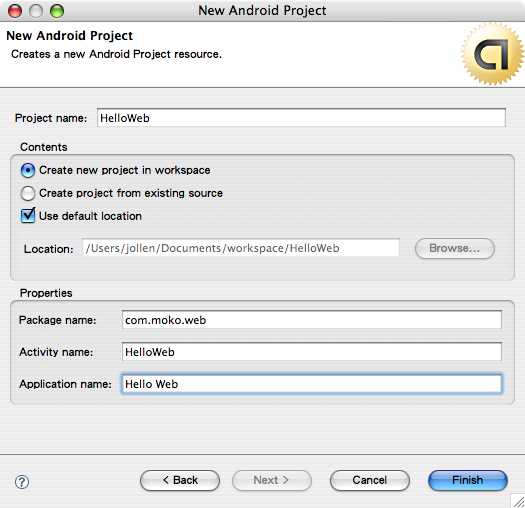
建立新專案: HelloWeb建立一個新的 Android 專案,如圖1。
並且撰寫 HelloWeb.java 程式如下:
package com.moko.web;

import android.app.Activity;
import android.os.Bundle;
import android.webkit.WebView;

import com.moko.web.R;

public class HelloWeb extends Activity {
    /** Called when the activity is first created. */
    @Override
    public void onCreate(Bundle savedInstanceState) {
        super.onCreate(savedInstanceState);
        setContentView(R.layout.main);

        final String mimetype = "text/html";
        final String encoding = "utf-8";

        WebView wv;

        wv = (WebView) findViewById(R.id.wv);
        wv.loadData("", mimetype, encoding);
    }
}
上述程式碼採用 XML layout 方式來安排 UI,因此接下來的工作就是編輯 XML layout 檔案。
規劃 UI: main.xml編輯 main.xml 來規劃「Hello Web」的 UI 如下:
android:orientation="vertical"
android:layout_width="fill_parent"
android:layout_height="wrap_content"
>android:layout_width="fill_parent"
android:layout_height="wrap_content"
android:id="@+id/wv"
/>
在這裡我們定義了「WebView」標籤,並且指定「WebView」的 ID 為「wv」。透過指定「ID」屬性給 View 的方式,便能「讓 Android 應用程式在執行時期(run-time)找到指定的 View 物件」。
使用 View 的 ID 屬性: findViewByID怎麼在執行時期,找到「XML layout」安排好的 View 呢?看到 HelloWeb.java 的程式片斷如下:
final String mimetype = "text/html";
final String encoding = "utf-8";
WebView wv;
wv = (WebView) findViewById(R.id.wv);
wv.loadData("
呼叫 findViewByID() 方法,即可在執行時期「動態取得 View 物件」。當我們在 main.xml 裡加入 WebView 標籤,「存檔」後,R.java 資源索引檔也會跟著更新,我們可透過「R.id.wv」來索引到 WebView 物件。以下是 R.java 的內容:
package com.moko.web;

public final class R {
    public static final class attr {
    }
    public static final class drawable {
        public static final int icon=0x7f020000;
    }
    public static final class id {
        public static final int wv=0x7f050000;
    }
    public static final class layout {
        public static final int main=0x7f030000;
    }
    public static final class string {
        public static final int app_name=0x7f040001;
        public static final int hello=0x7f040000;
    }
}
取得 WebView 物件後,呼叫 WebView 的 loadData() 方法,將 HTML 內容載入到 WebView 物件裡,並顯示在 Activity 上。loadData() 的參數如下:
Hello Web 範例程式所載入的 HTML 文件是一個
標籤,因此我們在視窗上所看到的內容就是一張圖檔,如下圖(使用真正的 Google Phone 做測試)。
是一個「排版」的類別,假設現在我們想要做出如圖1的文字排版效果,那麼使用 TableLayout 就是標準的做法。傳統寫程式排版的做法不是非常的方便,所以我們將採用 XML layout 方式來實作。
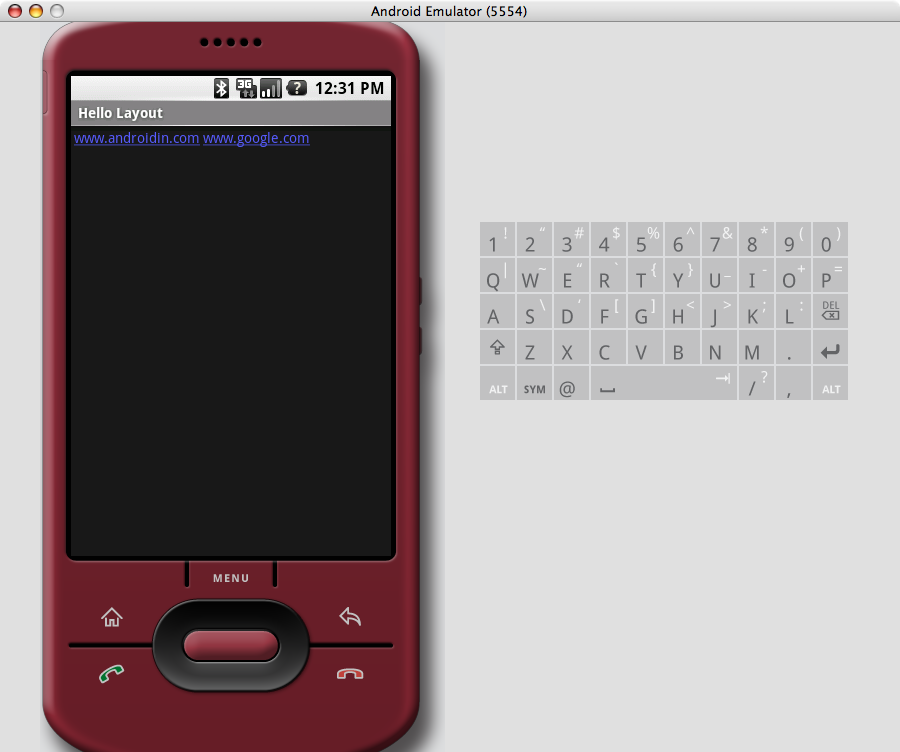
圖1: 文字並排顯示
建立新專案: HelloLayout建立新的專案「HelloLayout」,並撰寫程式碼如下:
package com.moko.layout;

import com.moko.layout.R;

import android.app.Activity;
import android.os.Bundle;

public class HelloLayout extends Activity {
    /** Called when the activity is first created. */
    @Override
    public void onCreate(Bundle savedInstanceState) {
        super.onCreate(savedInstanceState);
        setContentView(R.layout.main);
    }
}
由於我們採用 XML layout 的做法,所以主程式不需要做什麼修改。本範例的重點應該是在 main.xml 檔案的編寫。
設計 TableLayout: 編寫 main.xml新的 Android 專案創建時,預設是使用 LinearLayout(線性排版)來安排 UI。現在,我們將使用 TableLayout 來取代 LinearLayout,以「表格」方式來安排 UI。TableLayout 讓我們可以將畫面切割成一張表格,如果我們可以設計一個二欄式(2 columns)的表格,就可以做出如圖1的顯示效果了。
以下是 main.xml 的內容:
    android:layout_width="fill_parent"
    android:layout_height="fill_parent">


				    android:layout_width="fill_parent"
		    android:layout_height="wrap_content"
		    android:text=""
		    android:padding="3dip"
		    android:autoLink="web" />
				    android:layout_width="fill_parent"
		    android:layout_height="wrap_content"
		    android:text=""
		    android:autoLink="web" />
是配合 TableRow 使用的一個類別,當我們在 TableLayout 裡安排一個 TableRow 時,在 TableRow「裡頭的所有 View」就會被安排在同一列(row)裡。以本範例來說,在第一列(row)裡有二個 TextView,所以這二行文字顯示時,就會呈現如圖1的效果。
為了避免文字擠在一起,因此我們在 TextView 裡加上了 padding 的屬性,如下:
android:padding="3dip"第一個 TextView 的 padding 為 3dip,表示與旁邊的 View 必須空 3 個「間格」,這樣二個 TextView 才不會擠在一起。
到目前為止,我們都著重在 Activity 以及 UI 的介紹,在 Android 應用程式裡,有一種沒有 UI 的類別(android.app.Service),稱之為 Service。簡單來說,Service 是一個 background process(背景程序),透過背景程序,我們可以實作一些不需要 UI 的功能,例如:在背景撥放音樂。
以下是利用 Eclipse 環境自動產生的類別 'MokoService':
import android.app.Service;
import android.content.Intent;
import android.os.IBinder;

public class MokoService extends Service {

	@Override
	public IBinder onBind(Intent intent) {
		// TODO Auto-generated method stub
		return null;
	}

}
MokoService 類別繼承自 android.app.Service,幾個有關 Service 的重要觀念如下:
1. Service 物件以 separated process 的方式執行,這表示 Service 與 UI(Activity)並不在同一個 process 裡執行,而是個自在不同的 process 執行。
2. Android 應用程式是在 Activity 裡啟動與停止 Service。
3. 覆載(override)onStart() 方法(method)在 Service 被啟動時,執行我們想要的背景功能。
4. 覆載 onDestroy() 方法在 Service 被停止時,停止執行中的背景功能。
以下是一個加入 onStart 與 onDestroy 的 MokoService 實作:
目前,我們了解 Activity 與 Service 的觀念了,接下來,要怎麼在 Activity 裡啟動 Service 呢?import android.app.Service;
import android.content.Intent;
import android.os.IBinder;
public class MokoService extends Service {
@Override
public IBinder onBind(Intent intent) {
// TODO Auto-generated method stub
return null;
}
@Override
public void onStart(Intent intent, int startId) {
}
@Override
public void onDestroy() {
}
}
上一個課程裡,我們實作了一個 Service 的類別稱為 MokoService,現在我們想要在 Activity 裡載入並啟動 MokoService 類別,讓它可以在背景執行,請依以下步驟完成這個任務。。
修改 AndroidManifest.xml在 Package Explorer 視窗裡找到目前 Android 專案的資訊描述檔,檔名是 AndroidManifest.xml。這是一個用來描述 Android 應用程式「整體資訊」的檔案,每個 Android 應用程式專案都會有一個。在這裡修改 Androidmanifest.xml 的目的是為了「在我們的 Android 應用程式裡加入一個 Service 類別」,這樣才有辦法啟動 Service。修改後的內容如下,紅色的部份是新增的描述:。
      package="com.moko.hello"
      android:versionCode="1"
      android:versionName="1.0.0">

                          android:label="@string/app_name">
這是什麼意思呢?我們留待後續再做說明。接著只需要再加上一行程式碼,就能啟動 MokoService 類別了。
啟動 Service - startService()回到 HelloM 類別,加入一行程式碼:
public class HelloMoko extends Activity {
   /** Called when the activity is first created. */
   @Override
   public void onCreate(Bundle savedInstanceState) {
       super.onCreate(savedInstanceState);

       setContentView(R.layout.main);

       startService(new Intent ("com.moko.hello.START_MUSIC"));
   }
}
Activity 類別裡有一個 method 叫做 startService:
startService(Intent service)
呼叫 startService() 即可啟動一個 Service 類別,只是,startService() 的參數是一個「Intent」的型別,並不是所要啟動的類別名稱。「Intent」是一個很像「Event」的類別,後續我們再做比較精確的說明,在這 裡,我們不如把 Intent 當成是 Event(事件)。
當程式送出 com.moko.hello.START_MUSIC 事件給 Android 時,Android 便去尋找能處理此事件的類別,然後啟動它。在這裡,能處理 com.moko.hello.START_MUSIC 事件的類別就是 MokoService,這個關係就是透過 AndroidManifest.xml 的設定實現的。
Activity 是一個有 UI 的類別,Service 則是一個沒有 UI 的類別。要知道 Activity 是否啟動,只要看看手機是否出現畫面即可;要知道 Service 是否有啟動,最容易的方式就是透過「除錯」的方式。以下我們實際以一個完整專案方式來對 Android 應用程式做除錯。
建立 MokoService 類別
點擊 Eclipse 的 File -> New -> Class 項目,利用 Eclipse 的自動新增功能,在先前的 HelloMoko 專案裡建立 MokoService 類別,如圖1。欄位「Superclass」應填入 android.app.Service。
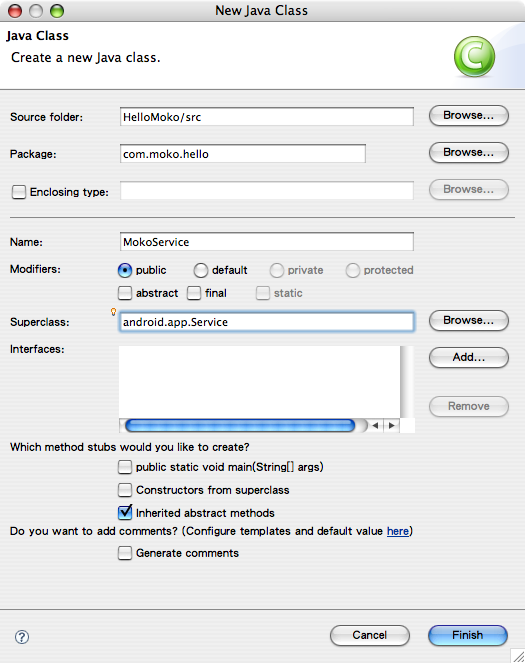
圖1: 建立 MokoService 類別
修改 MokoService 實作
在新增的 MokoService 類別裡,加入 onStart() 與 onDestory() 實作,如圖2。onStart() 的實作如下:
	@Override
	public void onStart(Intent intent, int startId) {
		super.onStart(intent, startId);
	}
因為 onStart() 是一個負載(override)實作,因此要呼叫 superclass 的 onStart() 方法。接著,將滑鼠移到 MokoService 類別裡的第 17 行(super.onStart),然後點擊 Run -> Toggle Breakpoint 在程式碼第 17 行的地方建立一個中斷點。
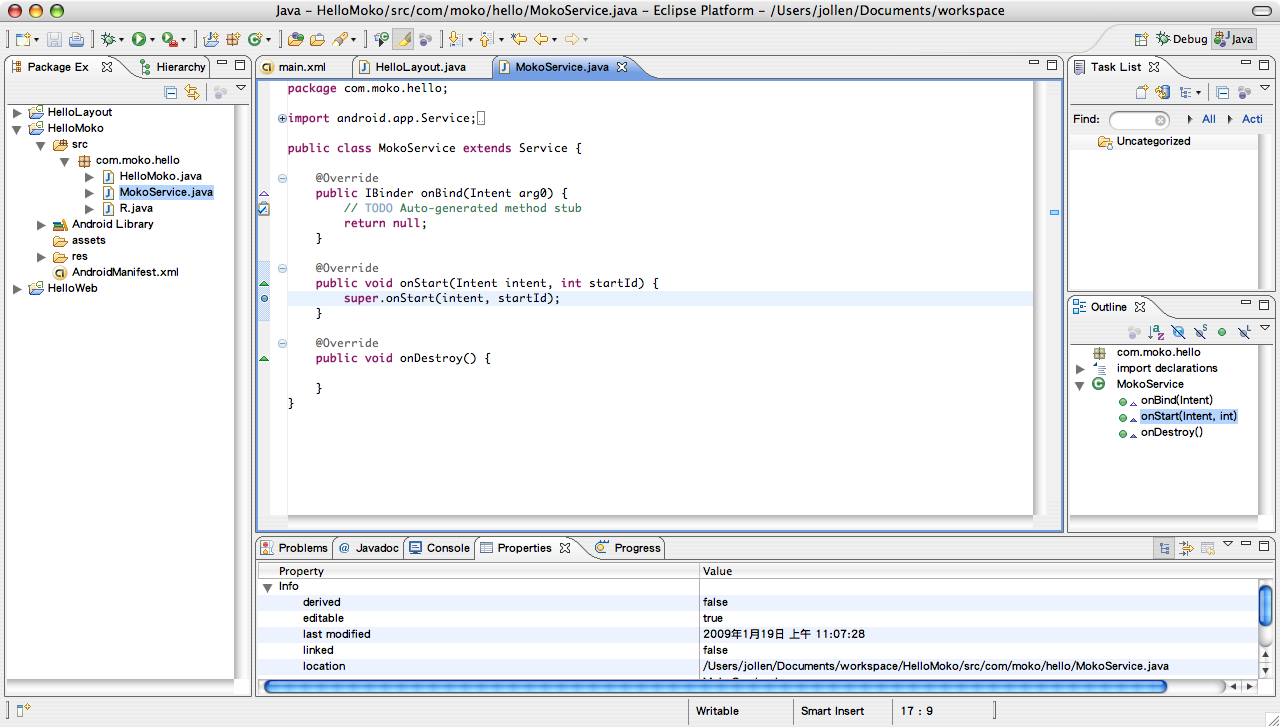
圖2: onStart() 與 onDestory() 實作與設定中斷點
除了 MokoService 類別外,我們還要修改 AndroidManifest.xml 並在 Activity 裡啟動 MokoService 類別,請參考 [教 學, #9] 的說明。
啟動除錯器
點擊 Run -> Debug Configurations 執行專案,並啟動除錯器。當 Android 應用程式成功安裝到 target device 並執行時, 會出現一個詢問對話框,選 Yes 即可,Eclipse 會將環境切換至除錯模式,如圖3。
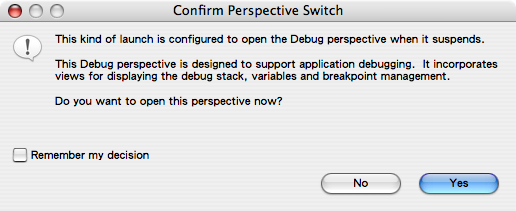
圖3: 是否要切換到除錯模式?
接著可以在除錯模式下看到 Android 應用程式停在先前所設定的中斷點(breakpoint),這表示 MokoService 類別已被 Android 系統載入並執行了,如圖4。
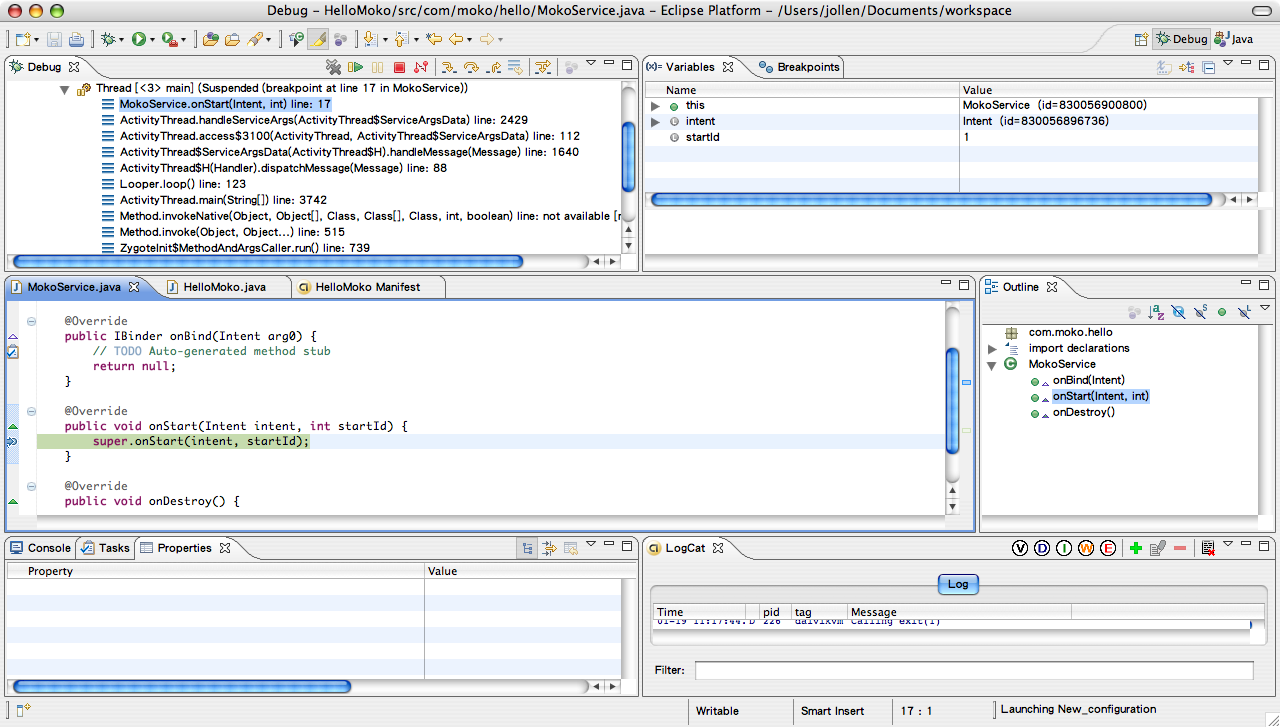
圖4: 程式在中斷點暫停
