Chinaunix首页 | 论坛 | 博客
  • 博客访问: 815364
  • 博文数量: 199
  • 博客积分: 6363
  • 博客等级: 准将
  • 技术积分: 2225
  • 用 户 组: 普通用户
  • 注册时间: 2007-04-28 10:01
个人简介

来自农村的老实娃

文章分类

全部博文(199)

文章存档

2017年(1)

2014年(2)

2013年(3)

2012年(6)

2011年(26)

2010年(34)

2009年(50)

2008年(44)

2007年(33)

我的朋友

分类: Oracle

2011-11-01 08:17:59

This article describes the installation of Oracle Database 11g Release 2 (11.2 64-bit) RAC on Linux (Oracle Enterprise Linux 5.4 64-bit) using NFS to provide the shared storage.
IntroductionNFS is an abbreviation of Network File System, a platform independent technology created by Sun Microsystems that allows shared access to files stored on computers via an interface called the Virtual File System (VFS) that runs on top of TCP/IP. Computers that share files are considered NFS servers, while those that access shared files are considered NFS clients. An individual computer can be either an NFS server, a NFS client or both.

We can use NFS to provide shared storage for a RAC installation. In a production environment we would expect the NFS server to be a NAS, but for testing it can just as easily be another server, or even one of the RAC nodes itself.

To cut costs, this articles uses one of the RAC nodes as the source of the shared storage. Obviously, this means if that node goes down the whole database is lost, so it's not a sensible idea to do this if you are testing high availability. If you have access to a NAS or a third server you can easily use that for the shared storage, making the whole solution much more resilient. Whichever route you take, the fundamentals of the installation are the same.

The Single Client Access Name (SCAN) should really be defined in the DNS or GNS and round-robin between one of 3 addresses, which are on the same subnet as the public and virtual IPs. In this article I've defined it as a single IP address in the "/etc/hosts" file, which is wrong and will cause the cluster verification to fail, but it allows me to complete the install without the presence of a DNS.

This article was inspired by the blog postings of .
Download SoftwareDownload the following software.
Operating System InstallationThis article uses Oracle Enterprise Linux 5.4. A general pictorial guide to the operating system installation can be found . More specifically, it should be a server installation with a minimum of 2G swap (preferably 3-4G), firewall and secure Linux disabled. Oracle recommend a default server installation, but if you perform a custom installation include the following package groups:
  • GNOME Desktop Environment
  • Editors
  • Graphical Internet
  • Text-based Internet
  • Development Libraries
  • Development Tools
  • Server Configuration Tools
  • Administration Tools
  • Base
  • System Tools
  • X Window System
To be consistent with the rest of the article, the following information should be set during the installation:

RAC1:
  • hostname: rac1.localdomain
  • IP Address eth0: 192.168.2.101 (public address)
  • Default Gateway eth0: 192.168.2.1 (public address)
  • IP Address eth1: 192.168.0.101 (private address)
  • Default Gateway eth1: none
RAC2:
  • hostname: rac2.localdomain
  • IP Address eth0: 192.168.2.102 (public address)
  • Default Gateway eth0: 192.168.2.1 (public address)
  • IP Address eth1: 192.168.0.102 (private address)
  • Default Gateway eth1: none
You are free to change the IP addresses to suit your network, but remember to stay consistent with those adjustments throughout the rest of the article.

Once the basic installation is complete, install the following packages whilst logged in as the root user. This includes the 64-bit and 32-bit versions of some packages.
# From Enterprise Linux 5 DVD cd /media/cdrom/Server rpm -Uvh binutils-2.* rpm -Uvh compat-libstdc++-33* rpm -Uvh elfutils-libelf-0.* rpm -Uvh elfutils-libelf-devel-* rpm -Uvh gcc-4.* rpm -Uvh gcc-c++-4.* rpm -Uvh glibc-2.* rpm -Uvh glibc-common-2.* rpm -Uvh glibc-devel-2.* rpm -Uvh glibc-headers-2.* rpm -Uvh ksh-2* rpm -Uvh libaio-0.* rpm -Uvh libaio-devel-0.* rpm -Uvh libgcc-4.* rpm -Uvh libstdc++-4.* rpm -Uvh libstdc++-devel-4.* rpm -Uvh make-3.* rpm -Uvh sysstat-7.* rpm -Uvh unixODBC-2.* rpm -Uvh unixODBC-devel-2.* cd / eject
Oracle Installation PrerequisitesPerform the following steps whilst logged into the RAC1 virtual machine as the root user.

Make sure the shared memory filesystem is big enough for Automatic Memory Manager to work.
# umount tmpfs # mount -t tmpfs shmfs -o size=1500m /dev/shm
Make the setting permanent by amending the "tmpfs" setting of the "/etc/fstab" file to look like this.
tmpfs /dev/shm tmpfs size=1500m 0 0
If you are not using DNS, the "/etc/hosts" file must contain the following information.
127.0.0.1 localhost.localdomain localhost # Public 192.168.2.101 rac1.localdomain rac1 192.168.2.102 rac2.localdomain rac2 #Private 192.168.0.101 rac1-priv.localdomain rac1-priv 192.168.0.102 rac2-priv.localdomain rac2-priv #Virtual 192.168.2.111 rac1-vip.localdomain rac1-vip 192.168.2.112 rac2-vip.localdomain rac2-vip # SCAN 192.168.2.201 rac-scan.localdomain rac-scan #NAS 192.168.2.101 nas1.localdomain nas1
Note. The SCAN address should not really be defined in the hosts file. Instead is should be defined on the DNS to round-robin between 3 addresses on the same subnet as the public IPs. For this installation, we will compromise and use the hosts file. If you are using DNS, then only the first line should be present in the "/etc/hosts" file. The other entries are defined in the DNS, as described . Also, the NAS1 entry is actually pointing to the RAC1 node. If you are using a real NAS or a third server to provide your shared storage put the correct IP address into the file.

Add or amend the following lines to the "/etc/sysctl.conf" file.
fs.aio-max-nr = 1048576 fs.file-max = 6815744 kernel.shmall = 2097152 kernel.shmmax = 536870912 kernel.shmmni = 4096 # semaphores: semmsl, semmns, semopm, semmni kernel.sem = 250 32000 100 128 net.ipv4.ip_local_port_range = 9000 65500 net.core.rmem_default=262144 net.core.rmem_max=4194304 net.core.wmem_default=262144 net.core.wmem_max=1048586
Run the following command to change the current kernel parameters.
/sbin/sysctl -p
Add the following lines to the "/etc/security/limits.conf" file.
oracle soft nproc 2047 oracle hard nproc 16384 oracle soft nofile 1024 oracle hard nofile 65536
Add the following lines to the "/etc/pam.d/login" file, if it does not already exist.
session required pam_limits.so
Disable secure linux by editing the "/etc/selinux/config" file, making sure the SELINUX flag is set as follows.
SELINUX=disabled
Alternatively, this alteration can be done using the GUI tool (System > Administration > Security Level and Firewall). Click on the SELinux tab and disable the feature.

Either configure NTP, or make sure it is not configured so the Oracle Cluster Time Synchronization Service (ctssd) can synchronize the times of the RAC nodes. In this case we will deconfigure NTP.
# service ntpd stop Shutting down ntpd: [ OK ] # chkconfig ntpd off # mv /etc/ntp.conf /etc/ntp.conf.org # rm /var/run/ntpd.pid
If you are using NTP, you must add the "-x" option into the following line in the "/etc/sysconfig/ntpd" file.
OPTIONS="-x -u ntp:ntp -p /var/run/ntpd.pid"
Then restart NTP.
# service ntpd restart
Start the Name Service Cache Daemon (nscd).
chkconfig --level 35 nscd on service nscd start
Create the new groups and users.
groupadd -g 1000 oinstall groupadd -g 1200 dba useradd -u 1100 -g oinstall -G dba oracle passwd oracle
Login as the oracle user and add the following lines at the end of the .bash_profile file.
# Oracle Settings TMP=/tmp; export TMP TMPDIR=$TMP; export TMPDIR ORACLE_HOSTNAME=rac1.localdomain; export ORACLE_HOSTNAME ORACLE_UNQNAME=rac; export ORACLE_UNQNAME ORACLE_BASE=/u01/app/oracle; export ORACLE_BASE ORACLE_HOME=$ORACLE_BASE/product/11.2.0/db_1; export ORACLE_HOME ORACLE_SID=rac1; export ORACLE_SID ORACLE_TERM=xterm; export ORACLE_TERM PATH=/usr/sbin:$PATH; export PATH PATH=$ORACLE_HOME/bin:$PATH; export PATH LD_LIBRARY_PATH=$ORACLE_HOME/lib:/lib:/usr/lib; export LD_LIBRARY_PATH CLASSPATH=$ORACLE_HOME/JRE:$ORACLE_HOME/jlib:$ORACLE_HOME/rdbms/jlib; export CLASSPATH if [ $USER = "oracle" ]; then if [ $SHELL = "/bin/ksh" ]; then ulimit -p 16384 ulimit -n 65536 else ulimit -u 16384 -n 65536 fi fi
Remember to amend the ORACLE_SID and ORACLE_HOSTNAME on each server.
Create Shared DisksFirst we need to set up some NFS shares. In this case we will do this on the RAC1 node, but you can do the on a NAS or a third server if you have one available. On the RAC1 node create the following directories.
mkdir /shared_config mkdir /shared_grid mkdir /shared_home mkdir /shared_data
Add the following lines to the /etc/exports file.
/shared_config *(rw,sync,no_wdelay,insecure_locks,no_root_squash) /shared_grid *(rw,sync,no_wdelay,insecure_locks,no_root_squash) /shared_home *(rw,sync,no_wdelay,insecure_locks,no_root_squash) /shared_data *(rw,sync,no_wdelay,insecure_locks,no_root_squash)
Run the following command to export the NFS shares.
chkconfig nfs on service nfs restart
On both RAC1 and RAC2 create the directories in which the Oracle software will be installed.
mkdir -p /u01/app/11.2.0/grid mkdir -p /u01/app/oracle/product/11.2.0/db_1 mkdir -p /u01/oradata mkdir -p /u01/shared_config chown -R oracle:oinstall /u01/app /u01/app/oracle /u01/oradata /u01/shared_config chmod -R 775 /u01/app /u01/app/oracle /u01/oradata /u01/shared_config
Add the following lines to the "/etc/fstab" file.
nas1:/shared_config /u01/shared_config nfs rw,bg,hard,nointr,tcp,vers=3,timeo=600,rsize=32768,wsize=32768,actimeo=0 0 0 nas1:/shared_grid /u01/app/11.2.0/grid nfs rw,bg,hard,nointr,tcp,vers=3,timeo=600,rsize=32768,wsize=32768,actimeo=0 0 0 nas1:/shared_home /u01/app/oracle/product/11.2.0/db_1 nfs rw,bg,hard,nointr,tcp,vers=3,timeo=600,rsize=32768,wsize=32768,actimeo=0 0 0 nas1:/shared_data /u01/oradata nfs rw,bg,hard,nointr,tcp,vers=3,timeo=600,rsize=32768,wsize=32768,actimeo=0 0 0
Mount the NFS shares on both servers.
mount /u01/shared_config mount /u01/app/11.2.0/grid mount /u01/app/oracle/product/11.2.0/db_1 mount /u01/oradata
Make sure the permissions on the shared directories are correct.
chown -R oracle:oinstall /u01/shared_config chown -R oracle:oinstall /u01/app/11.2.0/grid chown -R oracle:oinstall /u01/app/oracle/product/11.2.0/db_1 chown -R oracle:oinstall /u01/oradata
Install the Grid InfrastructureStart both RAC nodes, login to RAC1 as the oracle user and start the Oracle installer.
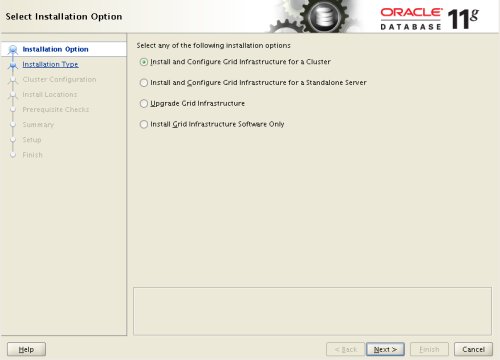
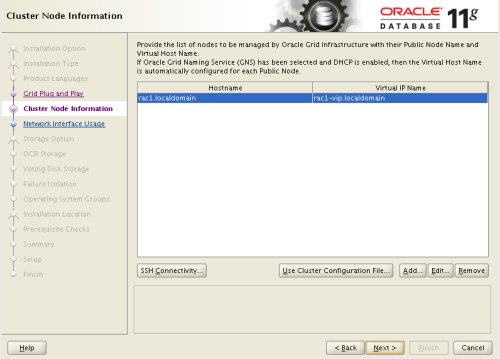
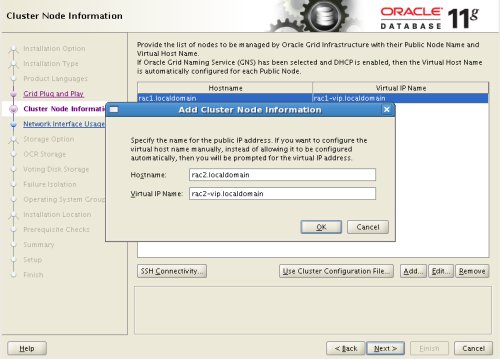
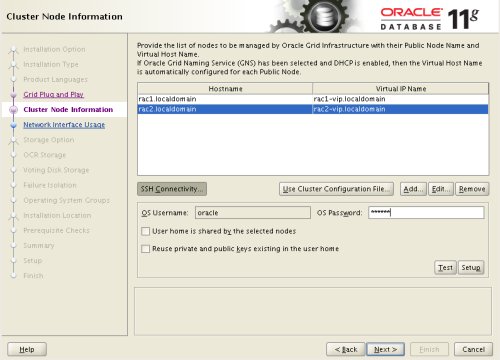
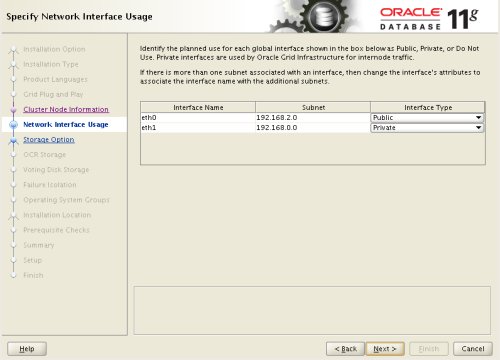
./runInstaller
Select the "Install and Configure Grid Infrastructure for a Cluster" option, then click the "Next" button.

Grid - Select Installation Option

Select the "Advanced Installation" option, then click the "Next" button.

Grid - Select Installation Type

Select the the required language support, then click the "Next" button.

Grid - Select Product Languages

Enter cluster information and uncheck the "Configure GNS" option, then click the "Next" button.

Grid - Grid Plug and Play Information

On the "Specify Node Information" screen, click the "Add" button.

Grid - Cluster Node Information

Enter the details of the second node in the cluster, then click the "OK" button.

Grid - Add Cluster Node Information

Click the "SSH Connectivity..." button and enter the password for the "oracle" user. Click the "Setup" button to to configure SSH connectivity, and the "Test" button to test it once it is complete. Click the "Next" button.

Grid - SSH Connectivity

Check the public and private networks are specified correctly, then click the "Next" button.

Grid - Specify Network Interface Usage

Select the "Shared File System" option, then click the "Next" button.

Grid - Storage Option Information

Select the required level of redundancy and enter the OCR File Location(s), then click the "Next" button.

Grid - OCR Storage Option

Select the required level of redundancy and enter the Voting Disk File Location(s), then click the "Next" button.

Grid - Voting Disk Storage Option

Accept the default failure isolation support by clicking the "Next" button.

Grid - Failure Isolation Support

Select the preferred OS groups for each option, then click the "Next" button. Click the "Yes" button on the subsequent message dialog.

Grid - Privileged Operating System Groups

Enter "/u01/app/oracle" as the Oracle Base and "/u01/app/11.2.0/grid" as the software location, then click the "Next" button.

Grid - Specify Install Location

Accept the default inventory directory by clicking the "Next" button.

Grid - Create Inventory

Wait while the prerequisite checks complete. If you have any issues, either fix them or check the "Ignore All" checkbox and click the "Next" button. If there are no issues, you will move directly to the summary screen. If you are happy with the summary information, click the "Finish" button.

Grid - Summary

Wait while the setup takes place.

Grid - Setup

When prompted, run the configuration scripts on each node.

Grid - Execute Configuration .s

The output from the "orainstRoot.sh" file should look something like that listed below.
# cd /u01/app/oraInventory # ./orainstRoot.sh Changing permissions of /u01/app/oraInventory. Adding read,write permissions for group. Removing read,write,execute permissions for world. Changing groupname of /u01/app/oraInventory to oinstall. The execution of the script is complete. #
The output of the root.sh will vary a little depending on the node it is run on. Example output can be seen here (, ).

Once the scripts have completed, return to the "Execute Configuration Scripts" screen on RAC1 and click the "OK" button.

Grid - Execute Configuration .s

Wait for the configuration assistants to complete.

Grid - Configuration Assistants

We expect the verification phase to fail with an error relating to the SCAN, assuming you are not using DNS.
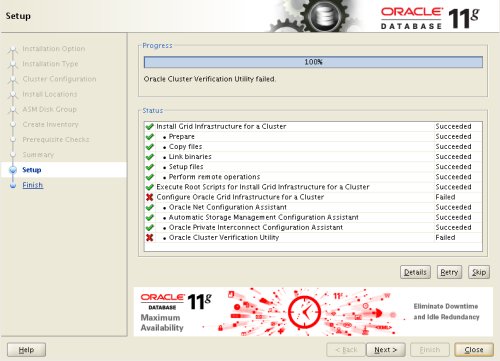
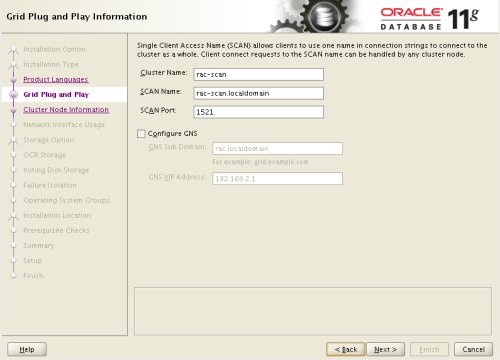
INFO: Checking Single Client Access Name (SCAN)... INFO: Checking name resolution setup for "rac-scan.localdomain"... INFO: ERROR: INFO: PRVF-4664 : Found inconsistent name resolution entries for SCAN name "rac-scan.localdomain" INFO: ERROR: INFO: PRVF-4657 : Name resolution setup check for "rac-scan.localdomain" (IP address: 192.168.2.201) failed INFO: ERROR: INFO: PRVF-4664 : Found inconsistent name resolution entries for SCAN name "rac-scan.localdomain" INFO: Verification of SCAN VIP and Listener setup failed
Provided this is the only error, it is safe to ignore this and continue by clicking the "Next" button.
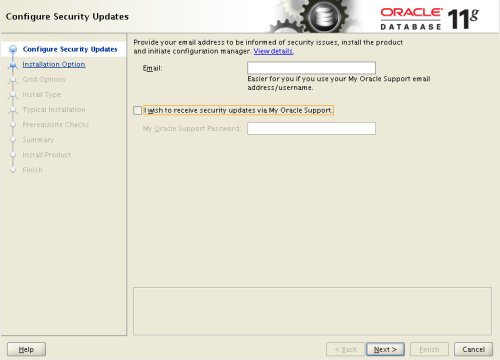
Click the "Close" button to exit the installer.

Grid - Finish

The grid infrastructure installation is now complete.
Install the DatabaseStart all the RAC nodes, login to RAC1 as the oracle user and start the Oracle installer.
./runInstaller
Uncheck the security updates checkbox and click the "Next" button.

DB - Configure Security Updates

Accept the "Create and configure a database" option by clicking the "Next" button.

DB - Select Installation Option

Accept the "Server Class" option by clicking the "Next" button.

DB - System Class

Make sure both nodes are selected, then click the "Next" button.

DB - Node Selection

Accept the "Typical install" option by clicking the "Next" button.

DB - Select Istall Type

Enter "/u01/app/oracle/product/11.2.0/db_1" for the software location. The storage type should be set to "File System" with the file location set to "/u01/oradata". Enter the appropriate passwords and database name, in this case "RAC.localdomain".

DB - Typical Install Configuration

Wait for the prerequisite check to complete. If there are any problems either fix them, or check the "Ignore All" checkbox and click the "Next" button.

DB - Perform Prerequisite Checks

If you are happy with the summary information, click the "Finish" button.

DB - Summary

Wait while the installation takes place.

DB - Install Product

Once the software installation is complete the Database Configuration Assistant (DBCA) will start automatically.

DB - DBCA

Once the Database Configuration Assistant (DBCA) has finished, click the "OK" button.

DB - DBCA Complete

When prompted, run the configuration scripts on each node. When the scripts have been run on each node, click the "OK" button.

DB - Execute Configuration .s

Click the "Close" button to exit the installer.

DB - Finish

The RAC database creation is now complete.
Check the Status of the RACThere are several ways to check the status of the RAC. The srvctl utility shows the current configuration and status of the RAC database.
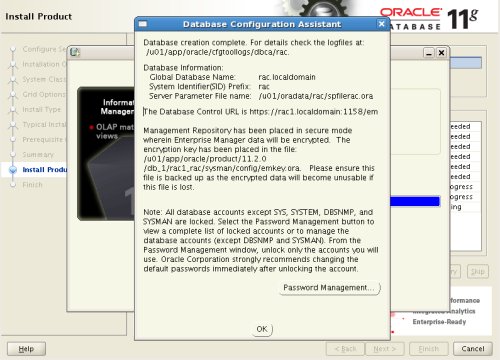
$ srvctl config database -d rac Database unique name: rac Database name: rac Oracle home: /u01/app/oracle/product/11.2.0/db_1 Oracle user: oracle Spfile: /u01/oradata/rac/spfilerac.ora Domain: localdomain Start options: open Stop options: immediate Database role: PRIMARY Management policy: AUTOMATIC Server pools: rac Database instances: rac1,rac2 Disk Groups: Services: Database is administrator managed $ $ srvctl status database -d rac Instance rac1 is running on node rac1 Instance rac2 is running on node rac2 $
The V$ACTIVE_INSTANCES view can also display the current status of the instances.
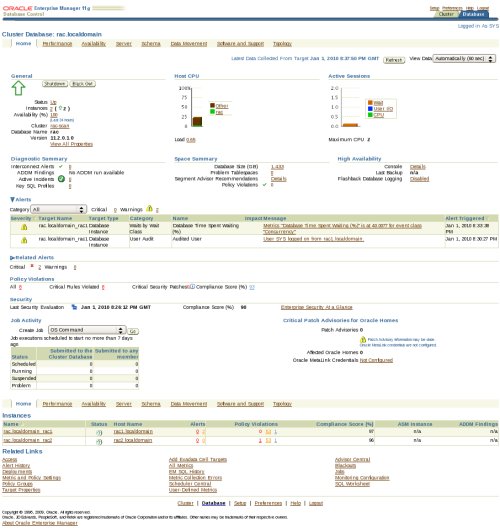
$ sqlplus / as sysdba SQL*Plus: Release 11.2.0.1.0 Production on Sat Sep 26 19:04:19 2009 Copyright (c) 1982, 2009, Oracle. All rights reserved. Connected to: Oracle Database 11g Enterprise Edition Release 11.2.0.1.0 - 64bit Production With the Partitioning, Real Application Clusters, Automatic Storage Management, OLAP, Data Mining and Real Application Testing options SQL> SELECT inst_name FROM v$active_instances; INST_NAME -------------------------------------------------------------------------------- rac1.localdomain:rac1 rac2.localdomain:rac2 SQL>
If you have configured Enterprise Manager, it can be used to view the configuration and current status of the database using a URL like "".

OEM

Direct NFS ClientFor improved NFS performance, Oracle recommend using the Direct NFS Client shipped with Oracle 11g. The direct NFS client looks for NFS details in the following locations:
  1. $ORACLE_HOME/dbs/oranfstab
  2. /etc/oranfstab
  3. /etc/mtab
Since we already have our NFS mount point details in the "/etc/fstab", and therefore the "/etc/mtab" file also, there is no need to configure any extra connection details.

For the client to work we need to switch the libodm11.so library for the libnfsodm11.so library, as shown below.
srvctl stop database -d rac cd $ORACLE_HOME/lib mv libodm11.so libodm11.so_stub ln -s libnfsodm11.so libodm11.so srvctl start database -d rac
With the configuration complete, you can see the direct NFS client usage via the following views:
  • v$dnfs_servers
  • v$dnfs_files
  • v$dnfs_channels
  • v$dnfs_stats
For example:
SQL> SELECT svrname, dirname FROM v$dnfs_servers; SVRNAME DIRNAME ------------- ----------------- nas1 /shared_data SQL>
The Direct NFS Client supports direct I/O and asynchronous I/O by default.

For more information see:
Hope this helps. Regards Tim...

阅读(1585) | 评论(0) | 转发(0) |
给主人留下些什么吧!~~