原文:http://dojotoolkit.org/documentation/tutorials/1.10/recipes/custom_widget/
难度等级:中级 Dojo 版本:1.10
介绍
Dojo 工具箱中包含了 Dijit 框架,它提供了一组图形化的控件叫 widgets。我们可以利用这些 widgets 创建图形用户界面。
有时你可能需要一个特定的 widget 可是 Dojo 又没有提供怎么办。你可以使用 Dijit's core 很容易的自己创建一个。
Setup
在我们的场景中,有一个 JSON 格式的数据源,罗列出编写 Dojo 教程的作者名单。数据格式如下:
-
[
-
{
-
"name": "Brian Arnold",
-
"avatar": "/includes/authors/brian_arnold/avatar.jpg",
-
"bio": "Brian Arnold is a software engineer at SitePen, Inc., ..."
-
},
-
/* More authors here... */
-
]
以上数据将放置在页面如下位置中:
-
<body>
-
<!-- Headers and whatnot -->
-
<h2>Authors</h2>
-
<div id="authorContainer">
-
<!-- Authors go -->
-
</div>
-
</body>
我们还想添加点特效--在鼠标滑过时背景色淡入淡出。最后,大致就是如下效果:

解决方案
我们可以简单地通过以下几步创建一个自己的 widget。
-
为我们的 widget 创建文件结构
-
创建独立显示每个作者的标签
-
增强作者标签,使其成为一个 Dijit模板
-
使用 declare 创建 widget class
-
调整样式(Style)
第1步: 为我们的 widget 创建文件结构
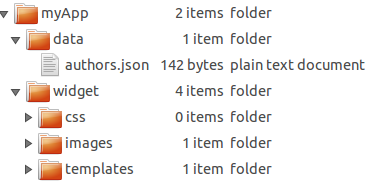
这一步可选,但一般为了更好的组织你的的小部件,建议还是建立一个适当的文件结构。这个案例中,我们用"myApp"目录容纳所有的 "定制" 代码 — "定制"的意思就是说专为这个 app 编写的那部分代码。常规代码以及第三方类库(比如 dojo, dijit, 等) 放在"myApp"平级目录。目录命名随便你取,但一般采用有意义的,比如能够体现组织关系,或 widget 同应用间关系的名字。我比较喜欢将自定义的 widgets 放到一起,因此在"myApp"下创建一个"widget"目录。我们要创建的这个 widget 取名叫 AuthorWidget --对应的模块 id 就是 myApp/widget/AuthorWidget。widgets 经常会关联一些其他资源,因此我们在 "widget" 又添加了一些目录 — css, images, 和 templates. 最终的目录结构类似如下:

当然我们现在还没有创建任何文件,只是先把目录层级规划出来了。
第2步: 创建独立显示每个作者的标签
我们已经有了文件结构,现在为每个作者创建一个简单的标签。作为你的第一个 widget,应该尽可能简单,因此我们创建一个非常基础的页面,可以直接把样本数据放进去。
如果你基于模板创建,一般你会创建一个包裹元素用来容纳所有其他的元素。这个包裹元素是什么无所谓,关键是要只有一个 root元素。考虑我们的数据,我们使用 div 作为包裹元素。作者姓名用 H3 ,图片用 img,bio 信息(见json 数据)用 p 元素装饰。
-
<div>
-
<h3>Brian Arnold</h3>
-
<img src="/includes/authors/brian_arnold/avatar.jpg">
-
<p>Brian Arnold is a software engineer at SitePen, Inc., ...</p>
-
</div>
第3步: 增强作者标签,使其成为一个 Dijit模板
使用 dijit/_TemplatedMixin,我们有几种方法来调整标签 markup :
-
You can have values from your widget automatically inserted
-
你可以将 template 中的某些元素指定为 Attach Points,这样便于在小部件内部对节点编程访问。
-
You can set up methods to be called on DOM events related to specific nodes
就这个例子,我们现在还不用操心处理事件---我们肯定是需要自动插入特性的(automatic insertion)。我们在myApp/widget/templates/ 目录下创建一个文件 AuthorWidget.html。它基本上就是上面说的那一堆标签,加上一些扩充的属性。
-
<div>
-
<h3 data-dojo-attach-point="nameNode">${name}</h3>
-
<img class="${baseClass}Avatar" src="" data-dojo-attach-point="avatarNode">
-
<p data-dojo-attach-point="bioNode">${!bio}</p>
-
</div>
这里有几点需要注意:
-
我们可以用 ${attribute} 这种语法形式直接插入值,比如说 name属性等。
-
我们可以用 ${!attribute} 这种语法形式直接插入值,比如上面代码中的 bio。${attribute} 和${!attribute} 两种语法形式的主要区别在于bio 属性包含 HTML,and we want to avoid having dijit/_TemplatedMixin perform automatic escaping on the inserted content.
-
所有基于 dijit/_WidgetBase 的 widgets 缺省都有一个属性叫 baseClass ,基于这个属性,我们再为 avatar 命名一个class 。
-
我们给 widget 中的所有 nodes 都添加了一个 attach point,因此在 widget 代码中,我们可以直接使用这个名字来引用 node。 Think of it kind of like doing some getElementById type work without needing IDs, where we set up references in advance — so with an instance of AuthorWidget, we could use myAuthor.nameNode to directly reference the H3 DOM node for that widget.
你可能主要到了,我们还没有给 avatar 设定图片源。What happens if we have an author that doesn't have an avatar specified? We don't want to show a broken image. We'll handle the default value for that when we create our widget, which we'll do now!
Step 4: 使用 dojo/_base/declare 创建 widget 类
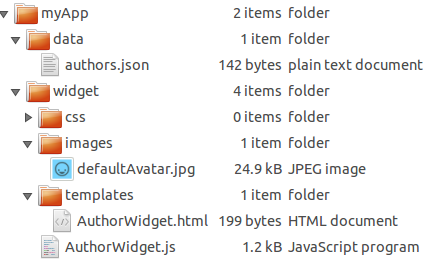
截至目前,我们已经创建了文件系统,widget 目录中也创建了 AuthorWidget.js。我们也添加了一个缺省的avatar image文件。我们的文件结构不断完善!这一步完成后,文件结构将更为完整。这一步我们会做大量的工作。

现在我们创建最简单的 widget!在 AuthorWidget.js 录入如下。
-
// myApp/widget/AuthorWidget.js
-
define(["dojo/_base/declare","dijit/_WidgetBase", "dijit/_TemplatedMixin"],
-
function(declare, _WidgetBase, _TemplatedMixin){
-
return declare([_WidgetBase, _TemplatedMixin], {
-
});
-
}); // and that
使用 declare 我们就可以基于 dijit/_WidgetBase 和 dijit/_TemplatedMixin 轻松地创建一个 AuthorWidget 。但如果止步于此,这个部件啥都做不了。我们还需要为 widget 添加一些属性,还要为一些属性设定缺省值(因为 widget 实例化时传入 options 不会涵盖所有值)。上面仅仅是 declaration 声明部分,现在我们来设置属性。
-
define([
-
"dojo/_base/declare",
-
"dojo/_base/fx",
-
"dojo/_base/lang",
-
"dojo/dom-style",
-
"dojo/mouse",
-
"dojo/on",
-
"dijit/_WidgetBase",
-
"dijit/_TemplatedMixin",
-
"dojo/text!./templates/AuthorWidget.html"
-
], function(declare, baseFx, lang, domStyle, mouse, on, _WidgetBase, _TemplatedMixin, template){
-
return declare([_WidgetBase, _TemplatedMixin], {
-
// Some default values for our author
-
// These typically map to whatever you're passing to the constructor
-
name: "No Name",
-
// Using require.toUrl, we can get a path to our AuthorWidget's space
-
// and we want to have a default avatar, just in case
-
avatar: require.toUrl("./images/defaultAvatar.png"),
-
bio: "",
-
-
// Our template -
-
templateString: template,
-
-
// A class to be applied to the root node in our template
-
baseClass: "authorWidget",
-
-
// A reference to our background animation
-
mouseAnim: null,
-
-
// Colors for our background animation
-
baseBackgroundColor: "#fff",
-
mouseBackgroundColor: "#def"
-
});
-
})
这里我们做了几件事,下面逐一讲解
-
We start off with some properties relevant to our author - name, bio, avatar - setting default values. By usingrequire.toUrl, we can get a path to where our AuthorWidget is located, and tap into the images folder under there.
-
Using the templateString property and dojo/text, we specify our template's contents.
-
We set our baseClass. This will be applied to our root node, which in our case is the div in our template.
-
We set up a reference for our animation, to be worked with in a moment, as well as a couple of colors for the animation.
目前一切良好,但止步于此,这仅仅是个显示信息的非常基础的 widget。我们可以添加一系列方法把事情做得更好。如下:
-
postCreate 方法中添加一些业务逻辑 (这是一个来自 _WidgetBase 的最常用的可扩展的 lifecycle method )
-
a custom property setter for the avatar property
-
a utility function to make it easy to change background color.
Let's visit each one of those.
The postCreate method is where we want to put the bulk of our work. It's called once our widget's DOM structure is ready, but before it's been inserted into the page. It's typically the best place to put any sort of initialization code.
-
postCreate: function(){
-
// Get a DOM node reference for the root of our widget
-
var domNode = this.domNode;
-
-
// Run any parent postCreate processes - can be done at any point
-
this.inherited(arguments);
-
-
// Set our DOM node's background color to white -
-
// smoothes out the mouseenter/leave event animations
-
domStyle.set(domNode, "backgroundColor", this.baseBackgroundColor);
-
// Set up our mouseenter/leave events
-
// Using dijit/Destroyable's "own" method ensures that event handlers are unregistered when the widget is destroyed
-
// Using dojo/mouse normalizes the non-standard mouseenter/leave events across browsers
-
// Passing a third parameter to lang.hitch allows us to specify not only the context,
-
// but also the first parameter passed to _changeBackground
-
this.own(
-
on(domNode, mouse.enter, lang.hitch(this, "_changeBackground", this.mouseBackgroundColor)),
-
on(domNode, mouse.leave, lang.hitch(this, "_changeBackground", this.baseBackgroundColor))
-
);
-
}
Here, we're setting some style based on our baseBackgroundColor
property, and then setting up some onmouseenter/onmouseleave events, so that as people mouse over the DOM node, our custom _changeBackground
function is called. Let's take a look at that:
-
_changeBackground: function(newColor) {
-
// If we have an animation, stop it
-
if (this.mouseAnim) {
-
this.mouseAnim.stop();
-
}
-
-
// Set up the new animation
-
this.mouseAnim = baseFx.animateProperty({
-
node: this.domNode,
-
properties: {
-
backgroundColor: newColor
-
},
-
onEnd: lang.hitch(this, function() {
-
// Clean up our mouseAnim property
-
this.mouseAnim = null;
-
})
-
}).play();
-
}
Here, we're setting some style based on our baseBackgroundColor property, and then setting up some onmouseenter/onmouseleave events, so that as people mouse over the DOM node, our custom _changeBackground function is called. Let's take a look at that:Here, we're setting some style based on our baseBackgroundColor property, and then setting up some onmouseenter/onmouseleave events, so that as people mouse over the DOM node, our custom _changeBackground function is called. Let's take a look at that:Here, we're setting some style based on our baseBackgroundColor property, and then setting up some onmouseenter/onmouseleave events, so that as people mouse over the DOM node, our custom _changeBackground function is called. Let's take a look at that:
阅读(2072) | 评论(0) | 转发(0) |


