
从零开始nodejs系列文章,将介绍如何利Javascript做为服务端脚本,通过Nodejs框架web开发。Nodejs框架是基于V8的引擎,是目前速度最快的Javascript引擎。chrome浏览器就基于V8,同时打开20-30个网页都很流畅。Nodejs标准的web开发框架Express,可以帮助我们迅速建立web站点,比起PHP的开发效率更高,而且学习曲线更低。非常适合小型网站,个性化网站,我们自己的Geek网站!!
关于作者
- 张丹(Conan), 程序员Java,R,PHP,Javascript
- weibo:@Conan_Z
- blog: http://blog.fens.me
- email: bsspirit@gmail.com
转载请注明出处:
http://blog.fens.me/jekyll-bootstarp-github/

前言
程序员会写程序是基本技能,程序员会写文档是更高的能力。用简单的图形表达架构,用流畅语言描述业务,用专业的文笔写成报告,看似简单的要求,但对于普通的程序员来说都是一种挑战。
有时候我们纠结的不是怎么组织文字,而是怎么排版,用哪种字体,居中还是靠右放置?如何能保持多人撰写文档的统一风格?
Jekyll可以帮助我们标准化文档结构,文档样式,文档过程。剩下就是提升自己的知识基础了。
目录
- Jekyll介绍
- 安装Ruby
- 安装Jekyll
- 用Jekyll构建基于bootstrap模板
- 发布到Github
1. Jekyll介绍
Jekyll是一个静态站点生成器,它会根据网页源码生成静态文件。它提供了模板、变量、插件等功能,可以用来生成整个网站。
Jekyll生成的站点,可以直接发布到github上面,这样我们就有了一个免费的,无限流量的,有人维护的属于我们的自己的web网站。Jekyll是基于Ruby的程序,可以通过gem来下载安装。
Jekyll官方文档:
2. 安装Ruby
我的系统环境
- win7 64bit
下载Ruby 2.0.0-p247 (x64):
安装Ruby,再安装RubyGems
 ~ D:\workspace\ruby>ruby --version
ruby 2.0.0p247 (2013-06-27) [x64-mingw32]

~ D:\workspace\ruby>gem update --system
Updating rubygems-update
Fetching: rubygems-update-2.1.10.gem (100%)
Successfully installed rubygems-update-2.1.10
Parsing documentation for rubygems-update-2.1.10
Installing ri documentation for rubygems-update-2.1.10
Installing darkfish documentation for rubygems-update-2.1.10
Installing RubyGems 2.1.10
RubyGems 2.1.10 installed
Parsing documentation for rubygems-2.1.10
Installing ri documentation for rubygems-2.1.10
3. 安装Jekyll
安装jekll
 ~ D:\workspace\ruby>gem install jekyll
ERROR:  Could not find a valid gem 'jekyll' (>= 0), here is why:
          Unable to download data from  - SSL_connect returned=1 errno=0 state=SSLv3 read server ce
rtificate B: certificate verify failed (
)
ERROR:  Possible alternatives: jekyll
问题1:下载认证文件
 ~ D:\workspace\ruby>curl http://curl.haxx.se/ca/cacert.pem -o cacert.pem
  % Total    % Received % Xferd  Average Speed   Time    Time     Time  Current
                                 Dload  Upload   Total   Spent    Left  Speed
100  223k  100  223k    0     0  82478      0  0:00:02  0:00:02 --:--:-- 94724

# 移动到Ruby安装目录
~ D:\workspace\ruby>mv cacert.pem D:\toolkit\Ruby200\bin
设置环境变量
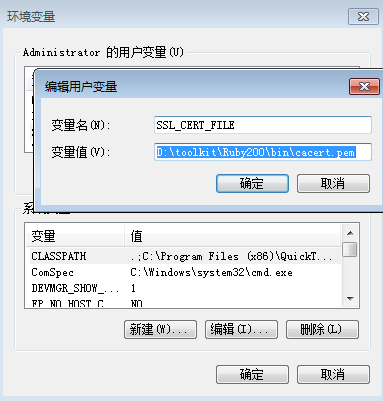
新打开一个命令行,再安装jekll
 ~ D:\workspace\ruby>gem install jekyll
ERROR:  Error installing jekyll:
        The 'fast-stemmer' native gem requires installed build tools.

Please update your PATH to include build tools or download the DevKit
from '' and follow the instructions
at ''
问题2:安装Devkit,下载DevKit-mingw64-64-4.7.2-20130224-1432-sfx.exe:
解压到目录:D:\toolkit\devkit
运行msys.bat,打开ruby命令行,再安装jekll
 Administrator@PC201304202140 ~
$ gem install jekyll
Building native extensions.  This could take a while...
Successfully installed fast-stemmer-1.0.2
Fetching: classifier-1.3.3.gem (100%)
Successfully installed classifier-1.3.3
Fetching: rb-fsevent-0.9.3.gem (100%)
Successfully installed rb-fsevent-0.9.3
Fetching: ffi-1.9.3-x64-mingw32.gem (100%)
Successfully installed ffi-1.9.3-x64-mingw32
Fetching: rb-inotify-0.9.2.gem (100%)
Successfully installed rb-inotify-0.9.2
Fetching: rb-kqueue-0.2.0.gem (100%)
Successfully installed rb-kqueue-0.2.0
Fetching: listen-1.3.1.gem (100%)
Successfully installed listen-1.3.1
Fetching: syntax-1.0.0.gem (100%)
Successfully installed syntax-1.0.0
Fetching: maruku-0.6.1.gem (100%)
Successfully installed maruku-0.6.1
Fetching: yajl-ruby-1.1.0.gem (100%)
Building native extensions.  This could take a while...
Successfully installed yajl-ruby-1.1.0
Fetching: posix-spawn-0.3.6.gem (100%)
Building native extensions.  This could take a while...
Successfully installed posix-spawn-0.3.6
Fetching: pygments.rb-0.5.4.gem (100%)
Successfully installed pygments.rb-0.5.4
Fetching: highline-1.6.20.gem (100%)
Successfully installed highline-1.6.20
Fetching: commander-4.1.5.gem (100%)
Successfully installed commander-4.1.5
Fetching: safe_yaml-0.9.7.gem (100%)
Successfully installed safe_yaml-0.9.7
Fetching: colorator-0.1.gem (100%)
Successfully installed colorator-0.1
Fetching: redcarpet-2.3.0.gem (100%)
Building native extensions.  This could take a while...
Successfully installed redcarpet-2.3.0
Fetching: jekyll-1.3.0.gem (100%)
Successfully installed jekyll-1.3.0
Parsing documentation for classifier-1.3.3
Installing ri documentation for classifier-1.3.3
Parsing documentation for colorator-0.1
Installing ri documentation for colorator-0.1
Parsing documentation for commander-4.1.5
Installing ri documentation for commander-4.1.5
Parsing documentation for fast-stemmer-1.0.2
unable to convert "\x90" from ASCII-8BIT to UTF-8 for lib/stemmer.so, skipping
Installing ri documentation for fast-stemmer-1.0.2
Parsing documentation for ffi-1.9.3-x64-mingw32
Installing ri documentation for ffi-1.9.3-x64-mingw32
Parsing documentation for highline-1.6.20
Installing ri documentation for highline-1.6.20
Parsing documentation for jekyll-1.3.0
Installing ri documentation for jekyll-1.3.0
Parsing documentation for listen-1.3.1
Installing ri documentation for listen-1.3.1
Parsing documentation for maruku-0.6.1
Couldn't find file to include 'MaRuKu.txt' from lib/maruku.rb
Installing ri documentation for maruku-0.6.1
Parsing documentation for posix-spawn-0.3.6
Installing ri documentation for posix-spawn-0.3.6
Parsing documentation for pygments.rb-0.5.4
Installing ri documentation for pygments.rb-0.5.4
Parsing documentation for rb-fsevent-0.9.3
Installing ri documentation for rb-fsevent-0.9.3
Parsing documentation for rb-inotify-0.9.2
Installing ri documentation for rb-inotify-0.9.2
Parsing documentation for rb-kqueue-0.2.0
Installing ri documentation for rb-kqueue-0.2.0
Parsing documentation for redcarpet-2.3.0
unable to convert "\x90" from ASCII-8BIT to UTF-8 for lib/redcarpet.so, skipping

Installing ri documentation for redcarpet-2.3.0
Parsing documentation for safe_yaml-0.9.7
Installing ri documentation for safe_yaml-0.9.7
Parsing documentation for syntax-1.0.0
Installing ri documentation for syntax-1.0.0
Parsing documentation for yajl-ruby-1.1.0
unable to convert "\x90" from ASCII-8BIT to UTF-8 for lib/yajl/yajl.so, skipping

Installing ri documentation for yajl-ruby-1.1.0
18 gems installed
这样就安装好了jekyll。
查看jekyll命令行帮助
 $ jekyll
  NAME:
    jekyll

  DESCRIPTION:
    Jekyll is a blog-aware, static site generator in Ruby

  COMMANDS:
    build                Build your site
    default
    docs                 Launch local server with docs for Jekyll v1.3.0
    doctor               Search site and print specific deprecation warnings
    help                 Display global or [command] help documentation.
    import               Import your old blog to Jekyll
    new                  Creates a new Jekyll site scaffold in PATH
    serve                Serve your site locally

  ALIASES:
    hyde                 doctor
    server               serve

  GLOBAL OPTIONS:
    -s, --source [DIR]
        Source directory (defaults to ./)
    -d, --destination [DIR]
        Destination directory (defaults to ./_site)
    --safe
        Safe mode (defaults to false)
    -p, --plugins PLUGINS_DIR1[,PLUGINS_DIR2[,...]]
        Plugins directory (defaults to ./_plugins)
    --layouts DIR
        Layouts directory (defaults to ./_layouts)
    -h, --help
        Display help documentation
    -v, --version
        Display version information
    -t, --trace
        Display backtrace when an error occurs
4. 用Jekyll构建基于bootstrap模板
下载jekyll-bootstrap的模板项目
 #从github下载模板
Administrator@PC201304202140 /d/workspace/ruby
$ git clone  jekyll
Cloning into 'jekyll'...
remote: Counting objects: 1898, done.
remote: Compressing objects: 100% (1061/1061), done.
remote: Total 1898 (delta 850), reused 1729 (delta 723)
Receiving objects: 100% (1898/1898), 575.45 KiB | 184 KiB/s, done.
Resolving deltas: 100% (850/850), done.

#进入项目目录
Administrator@PC201304202140 /d/workspace/ruby
$ cd jekyll/

#查看目录模板
Administrator@PC201304202140 /d/workspace/ruby/jekyll
$ ls
404.html          _config.yml  _plugins      atom.xml         pages.html
History.markdown  _drafts      _posts        categories.html  rss.xml
README.md         _includes    archive.html  changelog.md     sitemap.txt
Rakefile          _layouts     assets        index.md         tags.html

#启动服务
Administrator@PC201304202140 /d/workspace/ruby/jekyll
$ jekyll serve
Configuration file: d:/workspace/ruby/jekyll/_config.yml
            Source: d:/workspace/ruby/jekyll
       Destination: d:/workspace/ruby/jekyll/_site
      Generating... done.
    Server address:
  Server running... press ctrl-c to stop.
打开浏览器,
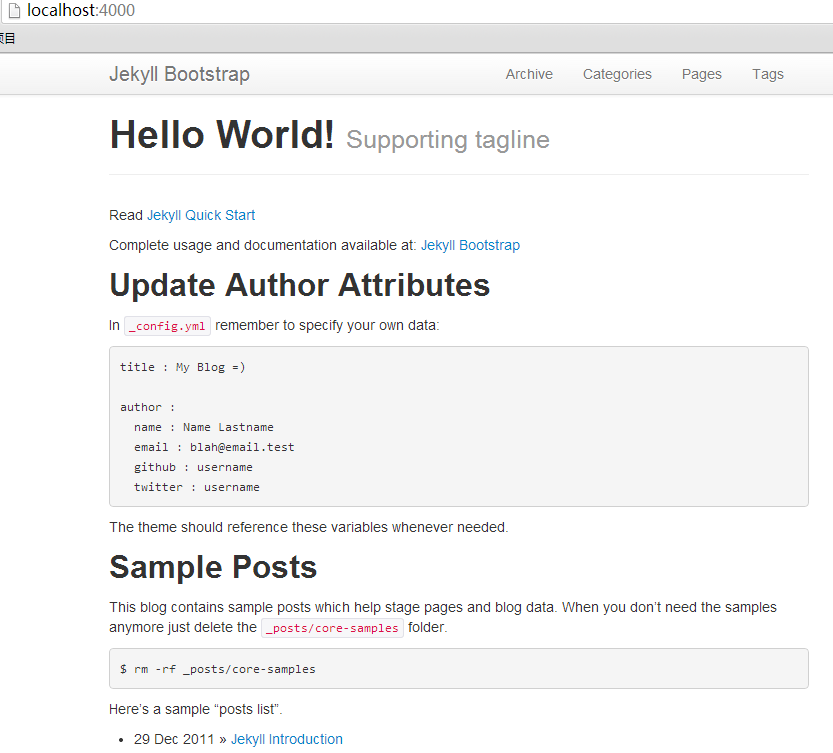
通过几条命令,基于bootstrap风格的模板就构建好了。
4. Jekyll的基本使用
- 编写新文章(Post)
- 编写新页面(Page)
1). 编写新文章(Create a Post)
通过命令生成文章
 ~ D:\workspace\ruby\jekyll>rake post title="Hello World"
Creating new post: ./_posts/2013-11-06-hello-world.md
查看文件:2013-11-06-hello-world.md
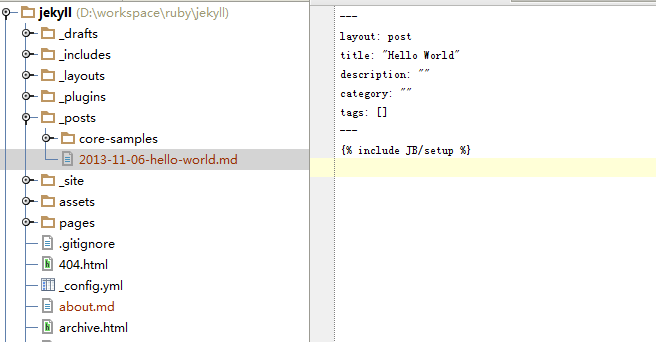
编辑文件:2013-11-06-hello-world.md
 ~ vi ./_posts/2013-11-06-hello-world.md

---
layout: post
title: "Hello World"
description: ""
category: ""
tags: []
---
{% include JB/setup %}

## 第一页,jekyll的开始

Jekyll is a parsing engine bundled as a ruby gem used to build static websites from
dynamic components such as templates, partials, liquid code, markdown, etc. Jekyll is known as "a simple, blog aware, static site generator".

### 博客文章:[用Jekyll构建基于bootstrap系统](http://blog.fens.me/jekyll-bootstarp-doc/)

程序员会写程序是基本技能,程序员会写文档是更高的能力。用简单的图形表达架构,用流畅语言描述业务,用专业的文笔写成报告,看似简单的要求,但对于普通的程序员来说都是一种挑战。

有时候我们纠结的不是怎么组织文字,而是怎么排版,用哪种字体,居中还是靠右放置?如何能保持多人撰写文档的统一风格?

Jekyll可以帮助我们标准化文档结构,文档样式,文档过程。剩下就是提升自己的知识基础了。
保存后,启动服务器。
 Administrator@PC201304202140 /d/workspace/ruby/jekyll
$ jekyll serve
Configuration file: d:/workspace/ruby/jekyll/_config.yml
            Source: d:/workspace/ruby/jekyll
       Destination: d:/workspace/ruby/jekyll/_site
      Generating... Error reading file d:/workspace/ruby/jekyll/_posts/2013-11-0
6-hello-world.md: invalid byte sequence in GBK
error: invalid byte sequence in GBK. Use --trace to view backtrace
发现中文的GBK编码报错。
找到jekyll安装目录,修改convertible.rb文件,第38行
 ~ vi D:\toolkit\Ruby200\lib\ruby\gems\2.0.0\gems\jekyll-1.3.0\lib\jekyll\convertible.rb

#第38行,替换为下面内容
self.content = File.read_with_options(File.join(base, name), :encoding => "utf-8")
重启服务器
 Administrator@PC201304202140 /d/workspace/ruby/jekyll
$ jekyll serve
Configuration file: d:/workspace/ruby/jekyll/_config.yml
            Source: d:/workspace/ruby/jekyll
       Destination: d:/workspace/ruby/jekyll/_site
      Generating...
 ___________________________________________________________________________
| Maruku tells you:
+---------------------------------------------------------------------------
| Could not find ref_id = "httpblogfensmejekyllbootstarpdoc" for md_link(["http:
//blog.fens.me/jekyll-bootstarp-doc/"],"httpblogfensmejekyllbootstarpdoc")
| Available refs are []
+---------------------------------------------------------------------------
!d:/toolkit/Ruby200/lib/ruby/gems/2.0.0/gems/maruku-0.6.1/lib/maruku/errors_mana
gement.rb:49:in `maruku_error'
!d:/toolkit/Ruby200/lib/ruby/gems/2.0.0/gems/maruku-0.6.1/lib/maruku/output/to_h
tml.rb:715:in `to_html_link'
!d:/toolkit/Ruby200/lib/ruby/gems/2.0.0/gems/maruku-0.6.1/lib/maruku/output/to_h
tml.rb:970:in `block in array_to_html'
!d:/toolkit/Ruby200/lib/ruby/gems/2.0.0/gems/maruku-0.6.1/lib/maruku/output/to_h
tml.rb:961:in `each'
!d:/toolkit/Ruby200/lib/ruby/gems/2.0.0/gems/maruku-0.6.1/lib/maruku/output/to_h
tml.rb:961:in `array_to_html'
\___________________________________________________________________________
Not creating a link for ref_id = "httpblogfensmejekyllbootstarpdoc".done.
    Server address:
  Server running... press ctrl-c to stop.
错误解决!
打开浏览器:2013/11/06/hello-world/
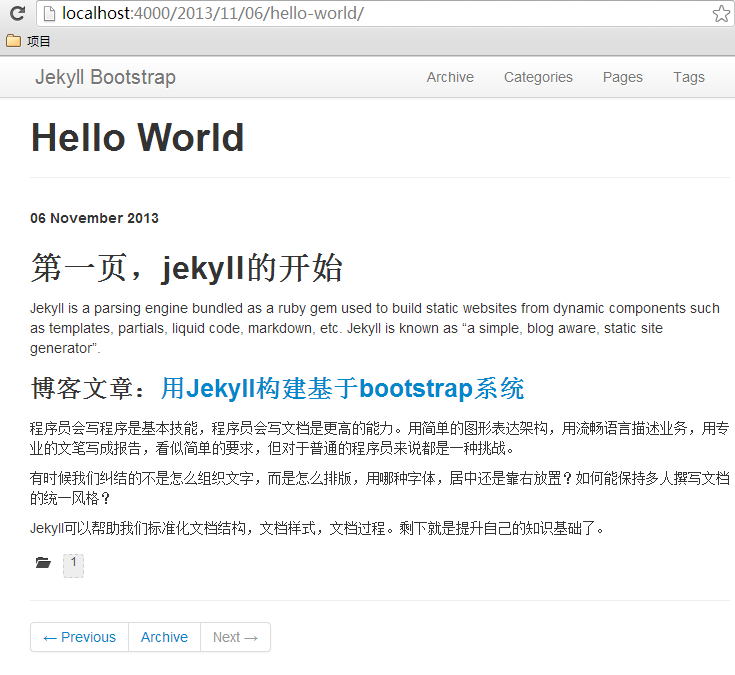
2). 编写新页面(Create a Page)
通过命令生成页面
 ~ D:\workspace\ruby\jekyll>rake page name="about.md"
mkdir -p .
Creating new page: ./about.md

~ D:\workspace\ruby\jekyll>rake page name="pages/about"
mkdir -p ./pages/about
Creating new page: ./pages/about/index.html
同样,我们编辑文件,重启jekyii服务就行了。
5. 发布到Github
在github网站,我们创建一个新的库,jekyll-demo
把jekll项目,添加到jekyll-demo
 ~ D:\workspace\ruby\jekyll>git remote set-url origin git@github.com:bsspirit/jekyll-demo.git

~ D:\workspace\ruby\jekyll>git add .
~ D:\workspace\ruby\jekyll>git commit -m 'new_post'
[master 1fc298e] 'new_post'
 4 files changed, 36 insertions(+)
 create mode 100644 _posts/2013-11-06-hello-world.md
 create mode 100644 about.md
 create mode 100644 pages/about/index.html

~ D:\workspace\ruby\jekyll>git push origin master
Counting objects: 916, done.
Delta compression using up to 4 threads.
Compressing objects: 100% (431/431), done.
Writing objects: 100% (916/916), 297.68 KiB, done.
Total 916 (delta 437), reused 879 (delta 422)
To git@github.com:bsspirit/jekyll-demo.git
 * [new branch]      master -> master
新建一个gh-pages分支,用于发布项目
 ~ git branch gh-pages
~ git checkout gh-pages
修改文件:_config.yml,设置base_path
 ~ vi _config.yml

production_url :
BASE_PATH : /jekyll-demo
发布项目
 ~ git add .
~ git commit -m 'deploy'
~ git push origin gh-pages
发布需要10分钟,10分钟后,在github上面浏览项目,
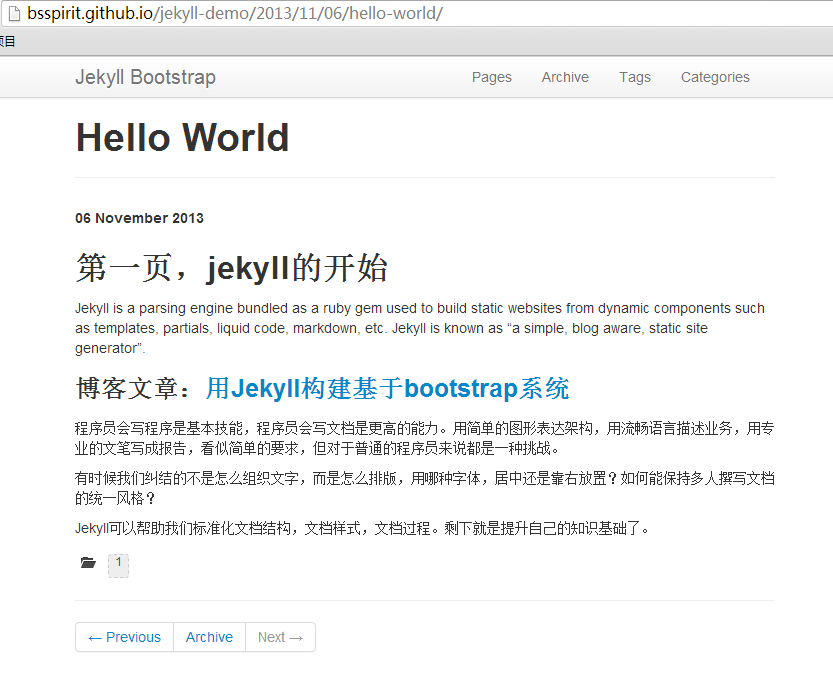
项目地址的格式为:
http://[username].github.io/[projectname]/
这样我们就可以通过github构建免费的web应用了。