全部博文(96)
分类: LINUX
2013-03-18 21:01:40
输入子系统浅析
作者:guolele1990 2011-1-11
网上有很多它们的解析,但是对于实际应用却很少有人举例,笔者在文章中先是解析一下输入子系统(input subsystem)构架先大概说一下,再是针对2440触摸屏的设计应用再讲,希望对大家有作用。
一、输入子系统架构
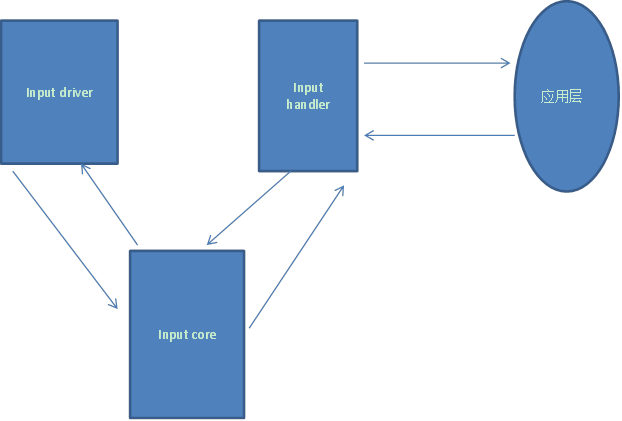
输入子系统在2.6内核的版本中用得很广,主要是有三层结构,input driver、input core、
Input handler,至于应用层怎么应用,那不是这系统内容,是实例的内容。
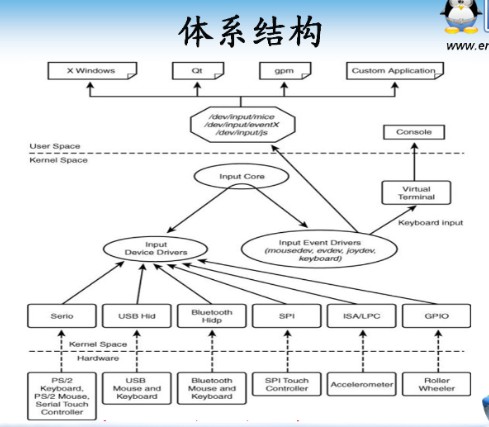
先例几个网上的经典图讲一下它们的关系。表一虽然是2.4内核的描述,但是思想还是相同的,
表一:
|
数据结构 |
用途 |
定义位置 |
具体数据结构的分配和初始化 |
|
Struct input_dev |
驱动层物理Input设备的基本数据结构 |
Input.h |
通常在具体的设备驱动中分配和填充具体的设备结构 |
|
Struct Evdev Struct Mousedev Struct Keybdev… |
Event Handler层逻辑Input设备的数据结构 |
Evdev.c Mousedev.c Keybdev.c |
Evdev.c/Mouedev.c …中分配
|
|
Struct Input_handler |
Event Handler的结构 |
Input.h |
Event Handler层,定义一个具体的Event Handler。 |
|
Struct Input_handle |
用来创建驱动层Dev和Handler链表的链表项结构 |
Input.h |
Event Handler层中分配,包含在Evdev/Mousedev…中。 |

1、 输入子系统驱动层(input driver)
这层主要的描述结构是struct input_dev,而这层设计的主要工作就是填充这结构体,然后注册,很简单?也很简单,就是填充时有点点麻烦,下面看看。
Struct input_dev
{
const char *name;
const char *phys;
const char *uniq;
struct input_id id;
unsigned long evbit[BITS_TO_LONGS(EV_CNT)];
unsigned long keybit[BITS_TO_LONGS(KEY_CNT)];
unsigned long relbit[BITS_TO_LONGS(REL_CNT)];
unsigned long absbit[BITS_TO_LONGS(ABS_CNT)];
……
int sync;
……
int (*open)(struct input_dev *dev);
void (*close)(struct input_dev *dev);
int (*flush)(struct input_dev *dev, struct file *file);
int (*event)(struct input_dev *dev, unsigned int type, unsigned int code, int value);
struct input_handle *grab;
……
struct device dev;
struct list_head h_list;
struct list_head node;
}
红色内容就是你要注意一下的内容,其中struct input_id id是用来填充你注册时匹配的依据,这等下会分析;open与close都是给handler层调用的函数,不然我怎么操作你这该死的硬件?flush函数是定义用来重新初始化设备,假如你串口乱了,我就再重新初始化一次;event函数是应用层输入子系统设备时得到调用,具体还在后面有点讲解。struct input_handle是用来连接handler层与driver层,具体连接就是双向链表,它既有driver层的struct input_dev结构也有handler层struct input_handler结构;struct device dev是什么?这不就是linux设备驱动模型里的设备吗?其实linux所有驱动都这种模型(总线、设备、驱动),只是应用于不同的地方,被不同的包装就成不同的子系统,更实际的就是kobject与kset的关系。
好填充完了就注册。注册使用input_register_device,这主要的工作就是创建个input device 和匹配handler(这与设备模型很像?也是注册是在链表中都找一次,找到了就匹配,其实都那么一回事)
看看内核描述。
/**
* input_register_device - register device with input core
* @dev: device to be registered
*
* This function registers device with input core. The device must be
* allocated with input_allocate_device() and all it's capabilities
* set up before registering.
* If function fails the device must be freed with input_free_device().
* Once device has been successfully registered it can be unregistered
* with input_unregister_device(); input_free_device() should not be
* called in this case.
*/
这还有input_alloc_device,就是创建,你都没创建怎么注册?注册完不用就用input_unregister_device注销
看注册,只分析重点
int input_register_device(struct input_dev *dev)
{
……
error = device_add(&dev->dev);//就是这家伙注册了设备,不就是设备模型吗?
……
list_for_each_entry(handler, &input_handler_list, node) input_attach_handler(dev, handler);
……
}
list_for_each_entry(handler, &input_handler_list, node) //这是内核链表找
input_attach_handler(dev, handler); //这丫的在干吗?其实就是匹配handler
看看怎么匹配
static int input_attach_handler(struct input_dev *dev, struct input_handler *handler)
{
const struct input_device_id *id;
int error;
//这设备可是黑名单,不敢匹配它,走人
if (handler->blacklist && input_match_device(handler->blacklist, dev))
return -ENODEV;
//白名单就看看行不,长得还可以
id = input_match_device(handler->id_table, dev);
if (!id)
return -ENODEV;
error = handler->connect(handler, dev, id);
……
}
在分析之前,可以看到,如果是匹配成功就会调用handler的connect函数,所以大家知道两层间的大概联系了吧?那什么是input core层?这只是虚拟的,因为它令两层之前接口都是统一的,相当于中间加了一层。
static const struct input_device_id *input_match_device(const struct input_device_id *id,
struct input_dev *dev)
{
int i;
for (; id->flags || id->driver_info; id++) {
if (id->flags & INPUT_DEVICE_ID_MATCH_BUS)
if (id->bustype != dev->id.bustype)
continue;
if (id->flags & INPUT_DEVICE_ID_MATCH_VENDOR)
if (id->vendor != dev->id.vendor)
continue;
if (id->flags & INPUT_DEVICE_ID_MATCH_PRODUCT)
if (id->product != dev->id.product)
continue;
if (id->flags & INPUT_DEVICE_ID_MATCH_VERSION)
if (id->version != dev->id.version)
continue;
MATCH_BIT(evbit, EV_MAX);
MATCH_BIT(keybit, KEY_MAX);
MATCH_BIT(relbit, REL_MAX);
MATCH_BIT(absbit, ABS_MAX);
MATCH_BIT(mscbit, MSC_MAX);
MATCH_BIT(ledbit, LED_MAX);
MATCH_BIT(sndbit, SND_MAX);
MATCH_BIT(ffbit, FF_MAX);
MATCH_BIT(swbit, SW_MAX);
return id;
}
return NULL;
}
这函数主要就是匹配input_dev与handler,匹配的依据就是struct input_id,所以在driver层里填充这数据是多么重要,你连身份证都没,谁嫁你?
至于MATCH_BIT宏的主要作用就是匹配不同的数据类型位
其中BITS_TO_LONGS宏就是将有几个bit转换成几个long型数据,因为每一个数据类型都是kernel_ulong_t
匹配完了,就会调用handler->connect
注册也大致分析到这,这一层的结构也大致明朗,也与input core(即那接口层)与input handler层 这三层有个结构联系。
2、 input core
刚才说了,这只是个接口层,就是无论你怎么变它连接的两层内容,只要用这样的接口(即函数)就可以联系到两层
3、 事件处理层(input handler)也叫event handler
这层的结构描述是struct input_handler还有个比较重要的联系两层的结构描述是struct input_handle(两个是不一样的,注意)
这层的主要任务是联系input_dev与input_handler(主要用input_handle),注册handler
刚才注册了input_dev时会调用handler的conect,那么我们应该在这函数需要建立它们的联系,就是要初始化handle,然后联系两层,具体操作就是
Handle->dev = input_dev; handle->handler = input_handler。具体实例在后面。
然后主要看input_handler
先上个内核描述
/**
* struct input_handler - implements one of interfaces for input devices
* @private: driver-specific data
* @event: event handler. This method is being called by input core with
* interrupts disabled and dev->event_lock spinlock held and so
* it may not sleep
* @connect: called when attaching a handler to an input device
* @disconnect: disconnects a handler from input device
* @start: starts handler for given handle. This function is called by
* input core right after connect() method and also when a process
* that "grabbed" a device releases it
* @fops: file operations this driver implements
* @minor: beginning of range of 32 minors for devices this driver
* can provide
* @name: name of the handler, to be shown in /proc/bus/input/handlers
* @id_table: pointer to a table of input_device_ids this driver can
* handle
* @blacklist: pointer to a table of input_device_ids this driver should
* ignore even if they match @id_table
* @h_list: list of input handles associated with the handler
* @node: for placing the driver onto input_handler_list
*
* Input handlers attach to input devices and create input handles. There
* are likely several handlers attached to any given input device at the
* same time. All of them will get their copy of input event generated by
* the device.
*
* Note that input core serializes calls to connect() and disconnect()
* methods.
*/
这里主要说了几个成员的作用(都是红的,说明它重要啊),其中connect是匹配成功得到调用,那同理disconnect就是不匹配时调用,具体就自己去看内核代码,一样的道理。值得注意的是start函数函数指针,内核描述它是说它是在connect一个特定的handle调用,这什么意思?有什么用?为什么不直接放到connect里?、
其实是因为一个handler可以有好几个设备,那么如果都能匹配,都要调用connect,但是并不是每一个设备的动作都一样,例如一个有两个键盘,如果一个键盘输入什么都不能理它,一个键盘要求输入什么都要理,那怎么区分?就是靠start,只要start里匹配的,我就操作什么(具体可以设计个标志)。
Fops,函数指针集,很熟悉,就是调用设备文件是它操作的相应,也就是应用层与这handler层的接口就在这。
Name,名字
Id_table,这不得了,不就是那美女要求配偶的要求吗?也就是input_dev与handler匹配的依据啊。
填充你会了吧?分析哪去了?你不会自己去看啊?提几点, input_dev层也有 event函数,它又是什么?什么时候调用?它是在反向传送,即从应用层>>>>handler层>>>>input core层>>>>>到driver层,典开的应用就是LED的输入子系统驱动,它是在应用层控制LED。
大致的讲解就到这。。。。。
二、实例分析(以2440的触摸屏与内核的evdev handler为例)
首先先注意一个问题,因为内核现在已经比较完善,很少会用到自己写的handler层,自己写也是没问题,等我们分析完evdev时就可以自己写,其实思路是一样的,所以我们可以参照evdev来写。
还有个问题,设备在应用层里读写是通过什么途径来实现的?不就是读写设备文件吗?那设备文件哪里来?driver层里是不会创建设备节点的,那它从哪里来?这主要任务就是交给evdev层,具体实现就是device_add,后面分析。
先看driver层,因为这是我们要写的,网上看2440触摸屏例子,都一个样,我这就修改一下,基本原理不变,只分析重点,不然就变得冗余,就像月光宝盒里的唐僧了。
主要的修改在于,我在open函数里申请中断,什么时候调用open? input_register_device时调用connect然后我们在设计connect时使用input_open_device函数就可以调用dev里open。同时使用input_close_device时调用close函数。
static int __init ts_init(void)
{
int ret;
DECLARE_WAIT_QUEUE_HEAD(ts_queue);
//初始化AD
//使能adc时钟信号
adc_clk = clk_get(NULL,"adc");
……
clk_enable(adc_clk);
base_addr = ioremap(S3C2410_PA_ADC,0x20);//io内存映射
……
iowrite32(S3C2410_ADCCON_PRSCEN | S3C2410_ADCCON_PRSCVL(0xff),\
base_addr + S3C2410_ADCCON);
iowrite32(0xffff, base_addr+S3C2410_ADCDLY);//设置开始延时寄存器值
s3c2410_ts_connect();//设置引脚工作模式
ts_inputdev = input_allocate_device();
……
//设置事件类型,而且触摸屏也是按键 evbit字段用来定义该输入设备可以支持的(产生和响应)的事件的类型,
//在此触摸屏设置为支持同步(EN_SYN)、按键(EN_KEY)、绝对坐标(EV_ABS)事件
ts_inputdev->evbit[0] = BIT(EV_SYN) | BIT(EV_KEY) | BIT(EV_ABS);
/* 设置所支持的按键(键值),触摸屏可以看成只有一个按键的设备 */
ts_inputdev->keybit[BITS_TO_LONGS(BTN_TOUCH)] = BIT(BTN_TOUCH);
//设定相对坐标的参数
input_set_abs_params(ts_inputdev, ABS_X, 0, 0x3FF, 0, 0);
input_set_abs_params(ts_inputdev, ABS_Y, 0, 0x3FF, 0, 0);
input_set_abs_params(ts_inputdev, ABS_PRESSURE, 0, 1, 0, 0);
//这些数据是为了注册时匹配handler
ts_inputdev->name = "s3c2410_ts";
ts_inputdev->open = ts_open;
ts_inputdev->phys = "/input0/s3c2410_ts";
ts_inputdev->close = ts_close;
ts_inputdev->event = ts_event;
ts_inputdev->id.bustype = BUS_RS232;
ts_inputdev->id.vendor = 0xdead;
ts_inputdev->id.product = 0xbeef;
ts_inputdev->id.version = S3C2410TSVERSION;
ret = input_register_device(ts_inputdev);
……
}
static void ts_exit(void)
{
input_unregister_device(ts_inputdev);
if (adc_clk) {
clk_disable(adc_clk);
clk_put(adc_clk);
adc_clk = NULL;
}
iounmap(base_addr);
printk(KERN_INFO"module exit\n");
}
现在看open
static int ts_open(struct input_dev *dev)
{
int ret;
iowrite32(WAIT4INT(0), base_addr+S3C2410_ADCTSC);//设定触摸屏控制寄存器,设置为检测按下
//申请adc中断
ret = request_irq(IRQ_ADC,adc_irq_handler,IRQF_SHARED | IRQF_SAMPLE_RANDOM,"s3c2410_adc",(void *)ts_inputdev);
if(ret)
{
printk(KERN_ERR"failed to request adc irq \n");
return -EIO;
}
ret = request_irq(IRQ_TC,ts_irq_handler,IRQF_SAMPLE_RANDOM,"s3c2410_ts",ts_inputdev);
if(ret)
{
printk(KERN_ERR"failed to request ts irq \n");
return -EIO;
}
printk(KERN_INFO"device open\n");
return 0;
}
static void ts_close(struct input_dev *dev)
{
free_irq(IRQ_TC,ts_inputdev);
free_irq(IRQ_ADC,ts_inputdev);
printk(KERN_INFO"device close\n");
}
都申请中断了,那么下一步就应该会产生中断,进入中断处理函数
static irqreturn_t ts_irq_handler(int irq,void *dev_id)
{
unsigned long data0;
unsigned long data1;
int updown;
……
//获取状态,因为第一次是等待中断模式,没正式开始转换
data0 = ioread32(base_addr + S3C2410_ADCDAT0);
data1 = ioread32(base_addr + S3C2410_ADCDAT1);
//被按下,updown为1否则为0
updown = ( !(data0 & S3C2410_ADCDAT0_UPDOWN) && !(data1 & S3C2410_ADCDAT0_UPDOWN));
if(updown)//被按下
{
PRINTK_DEBUG("DOWN/n");
StartADC = 1;
ts_timer_handler(0);
}
else//如果第一次即检测到没按下,检测到松手,停止AD转换
{
PRINTK_DEBUG("UP/n");
StartADC = 0;
iowrite32(WAIT4INT(0),base_addr + S3C2410_ADCTSC);//设置为等待按下
}
return IRQ_HANDLED;
}
产生了就进入adc中断
static irqreturn_t adc_irq_handler(int irq,void *dev_id)
{
PRINTK_DEBUG("adc irq\n");
……
if(StartADC)
{
xpos += ioread32(base_addr + S3C2410_ADCDAT0) & S3C2410_ADCDAT0_XPDATA_MASK;
ypos += ioread32(base_addr + S3C2410_ADCDAT1) & S3C2410_ADCDAT1_YPDATA_MASK;
count++;
if(count < 4)
{
//再次启动AD转换
iowrite32(AUTOPST | S3C2410_ADCTSC_PULL_UP_DISABLE,base_addr + S3C2410_ADCTSC);
iowrite32(S3C2410_ADCCON_PRSCEN | S3C2410_ADCCON_PRSCVL(0xff) | S3C2410_ADCCON_ENABLE_START,base_addr + S3C2410_ADCCON);
}
else
{
mod_timer(&ts_timer,jiffies+200);//一个时钟周期后就调用ts_timer_handler,用于上报数据
iowrite32(WAIT4INT(1),base_addr + S3C2410_ADCTSC);
PRINTK_DEBUG("timer agait\n");
//设置为等待松手
}
}
return IRQ_HANDLED;
}
转换1次后就会进入ts_timer,这个函数主要功能是,用于上报数据,从adc中断里,第二个作用是当你持续按下时产生连续读作用,详情可以看看内核定时器知识。
static void ts_timer_handler(unsigned long data)
{
……
data0 = ioread32(base_addr + S3C2410_ADCDAT0);
data1 = ioread32(base_addr + S3C2410_ADCDAT1);
//被按下,updown为1否则为0
updown = ( !(data0 & S3C2410_ADCDAT0_UPDOWN) && (!(data1 & S3C2410_ADCDAT0_UPDOWN)));
if(updown)//被按下
{
if(count != 0)//如果已经采样过,但是还按着,则报完后还启动AD
{
……
//取4次的平均值
xpos = xpos >> 2;
ypos = ypos >> 2;
input_report_abs(ts_inputdev,ABS_X,xpos);
input_report_abs(ts_inputdev,ABS_Y,ypos);
input_report_key(ts_inputdev, BTN_TOUCH, 1);
input_report_abs(ts_inputdev,ABS_PRESSURE,1);
input_sync(ts_inputdev);//同步
PRINTK_DEBUG("reported\n");
}
xpos = 0;
ypos = 0;
count = 0;
//启动AD转换,其中设模式为自动获取XY
iowrite32(AUTOPST | S3C2410_ADCTSC_PULL_UP_DISABLE,base_addr + S3C2410_ADCTSC);
iowrite32(ioread32(base_addr + S3C2410_ADCCON) | S3C2410_ADCCON_ENABLE_START,base_addr + S3C2410_ADCCON);
}
else//没被按下
{
StartADC = 0;
PRINTK_DEBUG("once ok\n");
count = 0;
input_report_key(ts_inputdev,BTN_TOUCH,0);
input_report_abs(ts_inputdev,ABS_PRESSURE,0);
input_sync(ts_inputdev);//同步
}
}
大致完成,现在看evdev,也是分析重点。
static int __init evdev_init(void)
{
return input_register_handler(&evdev_handler);
}
static void __exit evdev_exit(void)
{
input_unregister_handler(&evdev_handler);
}
就注册了个handler,背后去还有大量工作。
看evdev_handler
static struct input_handler evdev_handler = {
.event = evdev_event,
.connect = evdev_connect,
.disconnect = evdev_disconnect,
.fops = &evdev_fops,
.minor = EVDEV_MINOR_BASE,
.name = "evdev",
.id_table = evdev_ids,
};
初始化结构体,其中evdev_ids(美女择偶要求)为device_info=1,即所有都可以匹配,(看来都不算美啊)。
按执行顺序先看evdev_connect
主要就是用handle关联driver层与event层,还有一个就是创建设备文件
static int evdev_connect(struct input_handler *handler, struct input_dev *dev,
const struct input_device_id *id)
{
……
//这个循环判断的主要目的就是将evdev_table最后一个evdev的minor读出来
for (minor = 0; minor < EVDEV_MINORS; minor++)
if (!evdev_table[minor])
break;
//超过能处理的设备
if (minor == EVDEV_MINORS) {
。。。。。
//初始化evdev的结构,名字看到了吧?就是以后要处理的设备文件名
snprintf(evdev->name, sizeof(evdev->name), "event%d", minor);
evdev->exist = 1;
evdev->minor = minor;
//关联两层
evdev->handle.dev = input_get_device(dev);
evdev->handle.name = evdev->name;
evdev->handle.handler = handler;
evdev->handle.private = evdev;
strlcpy(evdev->dev.bus_id, evdev->name, sizeof(evdev->dev.bus_id));
evdev->dev.devt = MKDEV(INPUT_MAJOR, EVDEV_MINOR_BASE + minor);
//这个input_class是用来创建设备文件的,采用自动创建设备文件的方法,创建的class
evdev->dev.class = &input_class;
evdev->dev.parent = &dev->dev;
evdev->dev.release = evdev_free;
device_initialize(&evdev->dev);
error = input_register_handle(&evdev->handle);
……
error = evdev_install_chrdev(evdev);
if (error)
goto err_unregister_handle;
//这里就是创建了设备文件,具体就涉及kobject koset读者可以自己分析一下
error = device_add(&evdev->dev);
if (error)
goto err_cleanup_evdev;
return 0;
err_cleanup_evdev:
evdev_cleanup(evdev);
err_unregister_handle:
input_unregister_handle(&evdev->handle);
err_free_evdev:
put_device(&evdev->dev);
return error;
}
下面还是分析一下device_add,也是先上内核描述
/**
* device_add - add device to device hierarchy.
* @dev: device.
*
* This is part 2 of device_register(), though may be called
* separately _iff_ device_initialize() has been called separately.
*
* This adds it to the kobject hierarchy via kobject_add(), adds it
* to the global and sibling lists for the device, then
* adds it to the other relevant subsystems of the driver model.
*/
这里说了加kobject是通过kobject_add,之前的工作无非就是填充kobject这结构体
内核描述
/**
* kobject_add - the main kobject add function
* @kobj: the kobject to add
* @parent: pointer to the parent of the kobject.
* @fmt: format to name the kobject with.
*
* The kobject name is set and added to the kobject hierarchy in this
* function.
*
* If @parent is set, then the parent of the @kobj will be set to it.
* If @parent is NULL, then the parent of the @kobj will be set to the
* kobject associted with the kset assigned to this kobject. If no kset
* is assigned to the kobject, then the kobject will be located in the
* root of the sysfs tree.
*
* If this function returns an error, kobject_put() must be called to
* properly clean up the memory associated with the object.
* Under no instance should the kobject that is passed to this function
* be directly freed with a call to kfree(), that can leak memory.
*
* Note, no "add" uevent will be created with this call, the caller should set
* up all of the necessary sysfs files for the object and then call
* kobject_uevent() with the UEVENT_ADD parameter to ensure that
* userspace is properly notified of this kobject's creation.
*/
注意一下红色部分,它说的是如果想要通知事件,就要用kobject_event,然后这通知到达mdev(或者udev),然后创建出设备文件,那么我们这kobject_add是做些什么?对了,就是创建那个设备类calss以及它的属性文件。简单说就是,kobject_add>>> kobject_add_varg>>>> kobject_add_internal>>> create_dir>>> sysfs_create_dir>>>(如果目录下还有文件) populate_dir创建。
这就是一个设备类的创建。
现在看kobject_uevent(在device_add里),还是先上描述,懒啊
/**
* kobject_uevent - notify userspace by ending an uevent
*
* @action: action that is happening
* @kobj: struct kobject that the action is happening to
*
* Returns 0 if kobject_uevent() is completed with success or the
* corresponding error when it fails.
*/
可以知道这函数是通知用户空间,它实质就调用kobject_uevent_env通知udev
看kobject_uevent_env,
/**
* kobject_uevent_env - send an uevent with environmental data
*
* @action: action that is happening
* @kobj: struct kobject that the action is happening to
* @envp_ext: pointer to environmental data
*
* Returns 0 if kobject_uevent() is completed with success or the
* corresponding error when it fails.
*/
出来了,描述说它发送一个有环境数据的事件给用户空间(udev),然后udev就创建设备文件,这里就实现了event handler层与应用层的关联。对于kobject_uevent与udev的关系可看《Udev内核机制(kobject_uevent)性能优化》。
花了这么多笔墨在这是因为它是实现与应用层的关联,比较重要,不然你应用程序怎么用这设备?路都没了,你就算结婚了,也洞不了房。现在看回发生事件时,由driver_handler返回event数据后,处理程序evdev_event
static void evdev_event(struct input_handle *handle,
unsigned int type, unsigned int code, int value)
{
struct evdev *evdev = handle->private;
struct evdev_client *client;
struct input_event event;
do_gettimeofday(&event.time);
event.type = type;
event.code = code;
event.value = value;
rcu_read_lock();
client = rcu_dereference(evdev->grab);
if (client)
evdev_pass_event(client, &event);
else
list_for_each_entry_rcu(client, &evdev->client_list, node)
evdev_pass_event(client, &event);
rcu_read_unlock();
wake_up_interruptible(&evdev->wait);
}
这函数的主要作用 就是保存数据,然后唤醒等待队列(只有应用程序read设备文件才有),完工,基本上的联系就这样。那么如果应用程序发数据进来呢?不是有那个file_ops函数指针吗?通过它实现发数据进来,那么你可以write 设备文件,然后event handler层就保存好数据就调用input_inject_event()啥?又描述?
/**
* input_inject_event() - send input event from input handler
* @handle: input handle to send event through
* @type: type of the event
* @code: event code
* @value: value of the event
*
* Similar to input_event() but will ignore event if device is
* "grabbed" and handle injecting event is not the one that owns
* the device.
*/
可知它是传数据给driver层,它最后调用input_handle_event>>>
if ((disposition & INPUT_PASS_TO_DEVICE) && dev->event)
dev->event(dev, type, code, value);
if (disposition & INPUT_PASS_TO_HANDLERS)
input_pass_event(dev, type, code, value);
然后判断它是从哪那传到哪,调用不同的event.
唉,分析终于完了,现在总结一下。
Driver层就要是操作硬件,其中event是应用程序操作的间接接口
Input core层,主要是提供接口连接两层。
Input handler(event handler)层,主要是注册设备文件,创建与应用层的接口。
应用层就是操作