分类: LINUX
2009-12-31 09:24:01
可以安全的说,在过去的近20年里卖的每一款移动电话都拥有SMS消息功能。事实上,SMS消息是移动手机中一个杀手级的应用程序,它为移动运营商创造了稳定的收入源。理解如何在你的应用程序中使用SMS消息能帮助你产生灵感来创建下一个杀手级程序。
在这篇文章里,我将一览如何在你的Android应用程序中发送和接收SMS消息。对Android开发者来说,有个好消息是你不需要一款真实的设备来测试SMS消息——免费的Android模拟器提供这一功能。
发送SMS消息
开始,先启动Eclipse并创建一个新的Android工程。命名工程如图1所示。
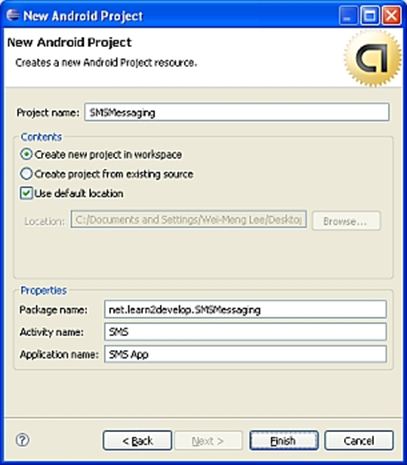
图1 使用Eclipse创建一个新的Android工程
Android使用一种基于权限的策略,应用程序所需的所有权限需要在AndroidManifest.xml文件中指定。通过这样做,当应用程序安装后,用户就能清楚地知晓应用程序需要哪些特定的访问权限。举个例子,发送SMS消息会引起用户的额外费用,在AndroidManifest.xml文件中指明SMS权限能让用户决定应用程序是否安装。
在AndroidManifest.xml文件中,添加两个权限——SEND_SMS和RECEIVE_SMS:
version="1.0" encoding="utf-8"?>
package="net.learn2develop.SMSMessaging"
android:versionCode="1"
android:versionName="1.0.0">
android:label="@string/app_name">
在res/layout文件夹下的main.xml文件中添加以下代码,这样,用户可以输入电话号码和要发送的消息:
version="1.0" encoding="utf-8"?>
android:orientation="vertical"
android:layout_width="fill_parent"
android:layout_height="fill_parent"
>
android:layout_width="fill_parent"
android:layout_height="wrap_content"
android:text="Enter the phone number of recipient"
/>
android:id="@+id/txtPhoneNo"
android:layout_width="fill_parent"
android:layout_height="wrap_content"
/>
android:layout_width="fill_parent"
android:layout_height="wrap_content"
android:text="Message"
/>
android:id="@+id/txtMessage"
android:layout_width="fill_parent"
android:layout_height="150px"
android:gravity="top"
/>
android:id="@+id/btnSendSMS"
android:layout_width="fill_parent"
android:layout_height="wrap_content"
android:text="Send SMS"
/>
上面的代码创建的UI如图2所示。

图2 创建发送SMS消息的UI
接下来,在SMS Activity中,我们连接Button View,这样当用户点击它时,我们可以检查接收者的电话号码和输入的消息,然后使用sendSMS函数来发送消息。
package net.learn2develop.SMSMessaging;
import android.app.Activity;
import android.app.PendingIntent;
import android.content.Intent;
import android.os.Bundle;
import android.telephony.gsm.SmsManager;
import android.view.View;
import android.widget.Button;
import android.widget.EditText;
import android.widget.Toast;
public class SMS extends Activity
{
btnSendSMS;
EditText txtPhoneNo;
EditText txtMessage;
/** Called when the activity is first created. */
@Override
public void onCreate(Bundle savedInstanceState)
{
super.onCreate(savedInstanceState);
setContentView(R.layout.main);
btnSendSMS = () findViewById(R.id.btnSendSMS);
txtPhoneNo = (EditText) findViewById(R.id.txtPhoneNo);
txtMessage = (EditText) findViewById(R.id.txtMessage);
btnSendSMS.setOnClickListener(new .OnClickListener()
{
public void onClick( v)
{
phoneNo = txtPhoneNo.getText().toString();
message = txtMessage.getText().toString();
if (phoneNo.length()>0 && message.length()>0)
sendSMS(phoneNo, message);
else
Toast.makeText(getBaseContext(),
"Please enter both phone number and message.",
Toast.LENGTH_SHORT).show();
}
});
}
}
sendSMS函数定义如下:
public class SMS extends Activity
{
//...
/** Called when the activity is first created. */
@Override
public void onCreate(Bundle savedInstanceState)
{
//...
}
//---sends an SMS message to another device---
private void sendSMS( phoneNumber, message)
{
PendingIntent pi = PendingIntent.getActivity(this, 0,
new Intent(this, SMS.class), 0);
SmsManager sms = SmsManager.getDefault();
sms.sendTextMessage(phoneNumber, null, message, pi, null);
}
}
为了发送一个SMS消息,你需要使用SmsManager类。不同于其它的类,你不需要直接实例化这个类;取而代之的是调用getDefault()静态方法来获取一个SmsManager对象。sendTextMessage()方法发送SMS消息和一个PendingIntent。PendingIntent对象用于在以后的时间识别触发的目标。例如,发送消息后,你可以使用PendingIntent对象来显示其它的Activity。在这里,PendingIntent对象(pi)简单指向相同的Activity(SMS.java),所以,当SMS发送后,什么事情也不会发生。
如果你需要监视SMS消息的发送过程状况,你可以使用两个PendingIntent对象以及两个BroadcastReceiver对象,像这样:
//---sends an SMS message to another device---
private void sendSMS( phoneNumber, message)
{
SENT = "SMS_SENT";
DELIVERED = "SMS_DELIVERED";
PendingIntent sentPI = PendingIntent.getBroadcast(this, 0,
new Intent(SENT), 0);
PendingIntent deliveredPI = PendingIntent.getBroadcast(this, 0,
new Intent(DELIVERED), 0);
//---when the SMS has been sent---
registerReceiver(new BroadcastReceiver(){
@Override
public void onReceive( arg0, Intent arg1) {
switch (getResultCode())
{
case Activity.RESULT_OK:
Toast.makeText(getBaseContext(), "SMS sent",
Toast.LENGTH_SHORT).show();
break;
case SmsManager.RESULT_ERROR_GENERIC_FAILURE:
Toast.makeText(getBaseContext(), "Generic failure",
Toast.LENGTH_SHORT).show();
break;
case SmsManager.RESULT_ERROR_NO_SERVICE:
Toast.makeText(getBaseContext(), "No service",
Toast.LENGTH_SHORT).show();
break;
case SmsManager.RESULT_ERROR_NULL_PDU:
Toast.makeText(getBaseContext(), "Null PDU",
Toast.LENGTH_SHORT).show();
break;
case SmsManager.RESULT_ERROR_RADIO_OFF:
Toast.makeText(getBaseContext(), "Radio off",
Toast.LENGTH_SHORT).show();
break;
}
}
}, new IntentFilter(SENT));
//---when the SMS has been delivered---
registerReceiver(new BroadcastReceiver(){
@Override
public void onReceive( arg0, Intent arg1) {
switch (getResultCode())
{
case Activity.RESULT_OK:
Toast.makeText(getBaseContext(), "SMS delivered",
Toast.LENGTH_SHORT).show();
break;
case Activity.RESULT_CANCELED:
Toast.makeText(getBaseContext(), "SMS not delivered",
Toast.LENGTH_SHORT).show();
break;
}
}
}, new IntentFilter(DELIVERED));
SmsManager sms = SmsManager.getDefault();
sms.sendTextMessage(phoneNumber, null, message, sentPI, deliveredPI);
}
上面的代码使用一个PendingIntent对象(sendPI)来监视发送过程。当SMS消息发送后,第一个BroadcastReceiver的onReceive事件会触发。在这里你可以检查发送过程的状态。第二个PendingIntent对象(deliveredPI)监视传送过程。当SMS消息成功送达时会触发第二个BroadcastReceiver的onReceive事件。
现在,你可以按下F11来测试应用程序了。为了从一个模拟器实例发送SMS消息到另一个实例,进入SDK的Tools文件夹并运行Emulator.exe来简单启动另一个Android模拟器实例。
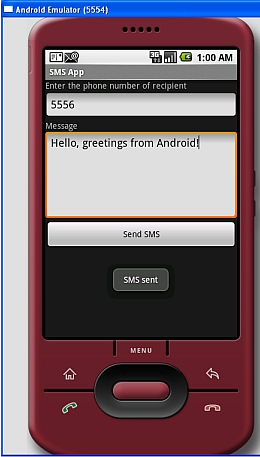
图3 发送SMS消息
图3演示了如何从一个模拟器发送SMS消息到另一个模拟器;使用目标模拟器的端口号(显示在窗口的左上角)作为它的电话号码。当SMS发送成功时,它会显示一个“SMS sent”消息。当它成功送达时,它会显示一个“SMS delivered”消息。注意,使用模拟器进行测试时,当SMS成功送达时,“SMS delivered”消息不会显示;它仅在真机上工作。
图4显示了接收模拟器中SMS消息接收后的样子。消息一开始显示在通知条上(屏幕的上方)。往下拖拽通知条,显示出接收到的消息。查看完整的消息,点击那个消息。

图4 Android模拟器接收SMS消息
如果你不想触及发送SMS消息的所有麻烦,你可以使用一个Intent对象来帮助你发送SMS消息。下面的代码就演示了如何引发内建的SMS程序来帮助你发送SMS消息:
Intent sendIntent = new Intent(Intent.ACTION_VIEW);
sendIntent.putExtra("sms_body", "Content of the SMS goes here...");
sendIntent.setType("vnd.android-dir/mms-sms");
startActivity(sendIntent);
图5显示了内建的SMS应用程序发送SMS消息。
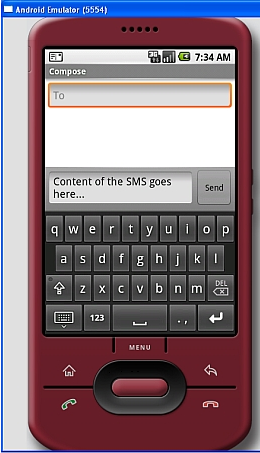
图5 引发内建的SMS程序
接收SMS消息
除了可以程序化的发送SMS消息,你还可以使用一个BroadcastReceiver对象来拦截新的SMS消息。
想看如何在Android应用程序中接收SMS消息的话,可以在AndroidManifest.xml文件中添加
version="1.0" encoding="utf-8"?>
package="net.learn2develop.SMSMessaging"
android:versionCode="1"
android:versionName="1.0.0">
android:label="@string/app_name">
"android.provider.Telephony.SMS_RECEIVED" />
添加一个新的类文件并命名为SmsReceiver.java(如图6)。
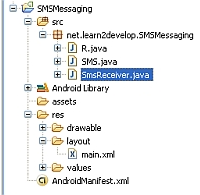
图6 添加SmsReceiver.java文件到工程中
在SmsReceiver类中,扩展BroadcastReceiver类,并重写onReceive方法:
package net.learn2develop.SMSMessaging;
import android.content.BroadcastReceiver;
import android.content.Context;
import android.content.Intent;
public class SmsReceiver extends BroadcastReceiver
{
@Override
public void onReceive( context, Intent intent)
{
}
}
当SMS消息接收后,onReceive()方法会触发。SMS消息附着在Intent对象上(onReceive方法的第二个参数,intent)的Bundle对象里。消息以PDU格式储存在一个对象数组里。要提取每个消息,可以使用SmsMessage类的createFromPdu()静态方法。然后,使用Toast类显示SMS消息:
package net.learn2develop.SMSMessaging;
import android.content.BroadcastReceiver;
import android.content.Context;
import android.content.Intent;
import android.os.Bundle;
import android.telephony.gsm.SmsMessage;
import android.widget.Toast;
public class SmsReceiver extends BroadcastReceiver
{
@Override
public void onReceive( context, Intent intent)
{
//---get the SMS message passed in---
Bundle bundle = intent.getExtras();
SmsMessage[] msgs = null;
str = "";
if (bundle != null)
{
//---retrieve the SMS message received---
[] pdus = ([]) bundle.get("pdus");
msgs = new SmsMessage[pdus.length];
for (int i=0; i<msgs.length; i++){
msgs[i] = SmsMessage.createFromPdu((byte[])pdus[i]);
str += "SMS from " + msgs[i].getOriginatingAddress();
str += " :";
str += msgs[i].getMessageBody().toString();
str += "\n";
}
//---display the new SMS message---
Toast.makeText(context, str, Toast.LENGTH_SHORT).show();
}
}
}
就是它了!测试应用程序,按下F11。为每个Android模拟器部署应用程序。图7显示了Eclipse中当前运行的模拟器。你所需要做的就是选择每个模拟器并部署应用程序到各自上。
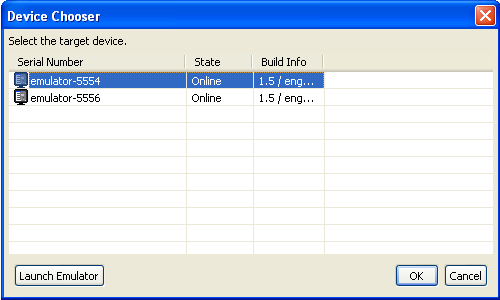
图7 选择模拟器来部署应用程序
图8显示了当你发送一个SMS消息给另一个模拟器实例时(端口号5556),目标模拟器接收到消息后会通过Toast类显示。

图8 使用模拟器发送和接收SMS消息
小结
在这片文章,你已经看到如何在你的Android应用程序中发送和接收SMS消息。发送和接收SMS消息的能力在你构建非常复杂的应用程序时非常有用。一个例子,你可以构建一个追踪位置的应用程序,通过它,你可以发送一个秘密编码的SMS消息给设备,当设备接收到秘密SMS消息后,它会回复另一个SMS消息,包含着当前的地理位置(使用内置的GPS receiver)。是不是很酷?!
