分类: LINUX
2011-04-05 15:31:45
The previous post explained how computers boot up right up to the point where the boot loader, after stuffing the kernel image into memory, is about to jump into the kernel entry point. This last post about booting takes a look at the guts of the kernel to see how an operating system starts life. Since I have an empirical bent I’ll link heavily to the sources for Linux kernel 2.6.25.6 at the . The sources are very readable if you are familiar with C-like syntax; even if you miss some details you can get the gist of what’s happening. The main obstacle is the lack of context around some of the code, such as when or why it runs or the underlying features of the machine. I hope to provide a bit of that context. Due to brevity (hah!) a lot of fun stuff – like interrupts and memory – gets only a nod for now. The post ends with the highlights for the Windows boot.
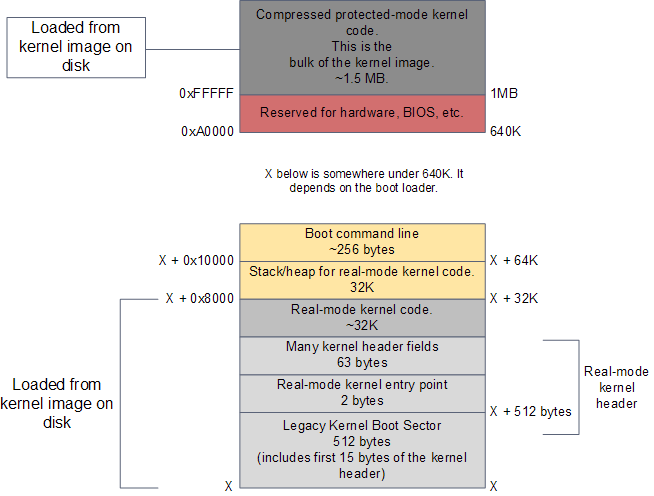
At this point in the Intel x86 boot story the processor is running in real-mode, is able to address 1 MB of memory, and RAM looks like this for a modern Linux system:

RAM contents after boot loader is done
The kernel image has been loaded to memory by the boot loader using the BIOS disk I/O services. This image is an exact copy of the file in your hard drive that contains the kernel, e.g./boot/vmlinuz-2.6.22-14-server. The image is split into two pieces: a small part containing the real-mode kernel code is loaded below the 640K barrier; the bulk of the kernel, which runs in protected mode, is loaded after the first megabyte of memory.
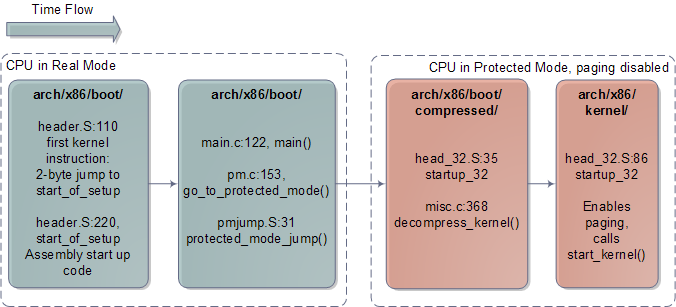
The action starts in the real-mode kernel header pictured above. This region of memory is used to implement the Linux boot protocol between the boot loader and the kernel. Some of the values there are read by the boot loader while doing its work. These include amenities such as a human-readable string containing the kernel version, but also crucial information like the size of the real-mode kernel piece. The boot loader also writes values to this region, such as the memory address for the command-line parameters given by the user in the boot menu. Once the boot loader is finished it has filled in all of the parameters required by the kernel header. It’s then time to jump into the kernel entry point. The diagram below shows the code sequence for the kernel initialization, along with source directories, files, and line numbers:

Architecture-specific Linux Kernel Initialization
The early kernel start-up for the Intel architecture is in file . It’s in assembly language, which is rare for the kernel at large but common for boot code. The start of this file actually contains boot sector code, a left over from the days when Linux could work without a boot loader. Nowadays this boot sector, if executed, only prints a “bugger_off_msg” to the user and reboots. Modern boot loaders ignore this legacy code. After the boot sector code we have the first 15 bytes of the real-mode kernel header; these two pieces together add up to 512 bytes, the size of a typical disk sector on Intel hardware.
After these 512 bytes, at offset 0×200, we find the very first instruction that runs as part of the Linux kernel: the real-mode entry point. It’s in and it is a 2-byte jump written directly in machine code as 0x3aeb. You can verify this by running hexdump on your kernel image and seeing the bytes at that offset – just a sanity check to make sure it’s not all a dream. The boot loader jumps into this location when it is finished, which in turn jumps to where we have a regular assembly routine called start_of_setup. This short routine sets up a stack, zeroes the segment (the area that contains static variables, so they start with zero values) for the real-mode kernel and then jumps to good old C code at .
main() does some house keeping like detecting memory layout, setting a video mode, etc. It then calls . Before the CPU can be set to protected mode, however, a few tasks must be done. There are two main issues: interrupts and memory. In real-mode the for the processor is always at memory address 0, whereas in protected mode the location of the interrupt vector table is stored in a CPU register called IDTR. Meanwhile, the translation of logical memory addresses (the ones programs manipulate) to linear memory addresses (a raw number from 0 to the top of the memory) is different between real-mode and protected mode. Protected mode requires a register called GDTR to be loaded with the address of a for memory. So go_to_protected_mode() calls and to install a temporary interrupt descriptor table and global descriptor table.
We’re now ready for the plunge into protected mode, which is done by , another assembly routine. This routine enables protected mode by setting the PE bit in the CR0 CPU register. At this point we’re running with disabled; paging is an optional feature of the processor, even in protected mode, and there’s no need for it yet. What’s important is that we’re no longer confined to the 640K barrier and can now address up to 4GB of RAM. The routine then calls the 32-bit kernel entry point, which is for compressed kernels. This routine does some basic register initializations and calls , a C function to do the actual decompression.
decompress_kernel() prints the familiar “Decompressing Linux…” message. Decompression happens in-place and once it’s finished the uncompressed kernel image has overwritten the compressed one pictured in the first diagram. Hence the uncompressed contents also start at 1MB. decompress_kernel() then prints “done.” and the comforting “Booting the kernel.” By “Booting” it means a jump to the final entry point in this whole story, given to Linus by God himself atop, which is the protected-mode kernel entry point at the start of the second megabyte of RAM (0×100000). That sacred location contains a routine called, uh, . But this one is in a different directory, you see.
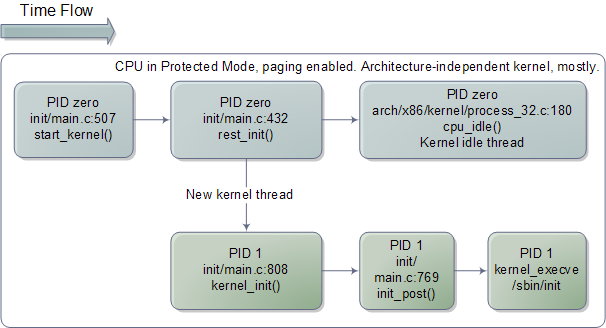
The second incarnation of startup_32 is also an assembly routine, but it contains 32-bit mode initializations. It clears the bss segment for the protected-mode kernel (which is the true kernel that will now run until the machine reboots or shuts down), sets up the final global descriptor table for memory, builds page tables so that paging can be turned on, enables paging, initializes a stack, creates the final interrupt descriptor table, and finally jumps to to the architecture-independent kernel start-up, . The diagram below shows the code flow for the last leg of the boot:

Architecture-independent Linux Kernel Initialization
start_kernel() looks more like typical kernel code, which is nearly all C and machine independent. The function is a long list of calls to initializations of the various kernel subsystems and data structures. These include the scheduler, memory zones, time keeping, and so on. start_kernel() then calls , at which point things are almost all working. rest_init() creates a kernel thread passing another function, , as the entry point. rest_init() then calls to kickstart task scheduling and goes to sleep by calling , which is the idle thread for the Linux kernel. cpu_idle() runs forever and so does process zero, which hosts it. Whenever there is work to do – a runnable process – process zero gets booted out of the CPU, only to return when no runnable processes are available.
But here’s the kicker for us. This idle loop is the end of the long thread we followed since boot, it’s the final descendent of the very first jump executed by the processor after power up. All of this mess, from reset vector to BIOS to MBR to boot loader to real-mode kernel to protected-mode kernel, all of it leads right here, jump by jump by jump it ends in the idle loop for the boot processor, cpu_idle(). Which is really kind of cool. However, this can’t be the whole story otherwise the computer would do no work.
At this point, the kernel thread started previously is ready to kick in, displacing process 0 and its idle thread. And so it does, at which point kernel_init() starts running since it was given as the thread entry point. is responsible for initializing the remaining CPUs in the system, which have been halted since boot. All of the code we’ve seen so far has been executed in a single CPU, called the boot processor. As the other CPUs, called application processors, are started they come up in real-mode and must run through several initializations as well. Many of the code paths are common, as you can see in the code for , but there are slight forks taken by the late-coming application processors. Finally, kernel_init() calls , which tries to execute a user-mode process in the following order: /sbin/init, /etc/init, /bin/init, and /bin/sh. If all fail, the kernel will panic. Luckily init is usually there, and starts running as PID 1. It checks its configuration file to figure out which processes to launch, which might include X11 Windows, programs for logging in on the console, network daemons, and so on. Thus ends the boot process as yet another Linux box starts running somewhere. May your uptime be long and untroubled.
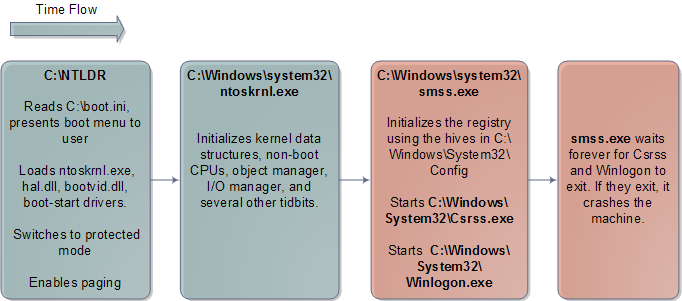
The process for Windows is similar in many ways, given the common architecture. Many of the same problems are faced and similar initializations must be done. When it comes to boot one of the biggest differences is that Windows packs all of the real-mode kernel code, and some of the initial protected mode code, into the boot loader itself (C:\NTLDR). So instead of having two regions in the same kernel image, Windows uses different binary images. Plus Linux completely separates boot loader and kernel; in a way this automatically falls out of the open source process. The diagram below shows the main bits for the Windows kernel:

Windows Kernel Initialization
The Windows user-mode start-up is naturally very different. There’s no /sbin/init, but rather Csrss.exe and Winlogon.exe. Winlogon spawns Services.exe, which starts all of the Windows Services, and Lsass.exe, the local security authentication subsystem. The classic Windows login dialog runs in the context of Winlogon.
This is the end of this boot series. Thanks everyone for reading and for feedback. I’m sorry some things got superficial treatment; I’ve gotta start somewhere and only so much fits into blog-sized bites. But nothing like a day after the next; my plan is to do regular “Software Illustrated” posts like this series along with other topics. Meanwhile, here are some resources:
[Update: In a comment below, Nix covered a lot of ground on the initial root file system that I glossed over. Thanks to for catching a mistake where I wrote "CR3" instead of GDTR]